See the other articles in this series, especially Table covers – choices, which discusses the most common fabrics used. Also search online for articles and videos about working with your chosen fabric, as well as any sewing techniques you want to brush up on.
Some background: My sewing machine is a Pfaff model 6122 with a walking foot (helpful, but not essential). I have many years of experience sewing, having made my own clothes in high school, plus a decade of making things for the boat, using heavy fabrics without patterns. I would say this project requires a medium-duty machine and sewing skills beyond basic, but much less than expert. A quilter used to dealing with large pieces of fabric would have no trouble. The exception would be working with real velvet (instead of a substitute like velour); I feel prior experience with that fabric is needed for such a large project.
I don’t have a serger, relying on a zigzag stitch to seal any cut edges that required it. I know someone who did serge all the edges of some bell table skirts, so it’s an option.
Before you start making table skirts:
• Preshrink fabric, if advisable
• Identify nap direction, and mark the top edge of every piece with safety pins
• Be sure the floor under the sewing table is clean, because the fabric will end up there. If working somewhere like a church hall also used for meals, consider putting down clean sheets or butcher paper. If you need to walk on the fabric, take off shoes.
• Wind skirt thread on some extra bobbins, to save time later.
I’m going to start these instructions with gathering the skirt by hand. This was the most time-consuming part of the project. Other options:
• If you have another method you prefer for gathering the skirt, like a gathering foot on your sewing machine, feel free to use it.
• If you purchased drapery tape for pleats or gathers, go online to the manufacturer’s website to read instructions.
• Of course, you can leave the skirt straight.
You don’t need to finish the top edge before gathering if you plan to attach something to it, like a band of fabric, or the table top fabric. If pleating, you’ll probably want to hem the top edge before making pleats. Remember that you can stitch a line near the top of the finished pleat to hold it in place, if necessary.
Gathering: It can be difficult to gather a long piece of fabric evenly. I divided my unfinished fabric into sections (marking it, but not cutting it), then gathered each section. I chose one yard increments, each to be gathered into a 1 foot finished length, for a 3:1 ratio of fabric to finished skirt length. Since my tables are each 3 feet long, I used them as a yardstick for these rough measurements, running the fabric off the bolt along the table, and marking each 3 foot interval at the top with safety pins. (I left about 14 inches at the end of the fabric, to allow for the back edge of the table skirt to remain ungathered. If you were making skirts for a choir, you would leave the sides ungathered between adjacent tables.) I measured and marked without stretching the fabric.
To obtain a 9 foot gathered skirt with 2 gathered sides of 30 inches wide required 14 of these sections:
(9 feet x 12 inches per foot) + (2 x 30 inches) = 168 inches
168 inches x 3 for gathering factor = 504 inches
504 inches divided by 36 inches per section = 14 sections
Another way of looking at it would be:
9 feet across the front and a total of 5 feet (or 60 inches) along the sides = 14 feet
Each finished section is 1 foot, for a total of 14 sections.
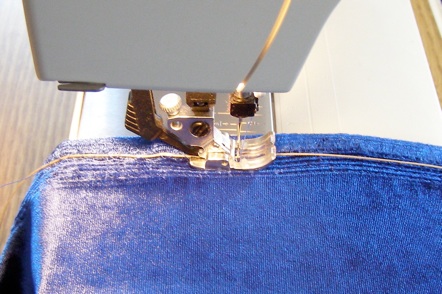 I stitched lengths of heavy thread to the top selvage, catching it under a large zigzag stitch. I used sail repair thread, because I had some, but you could use crochet thread or any heavy thread. I first cut the sail thread to roughly 42 inch lengths, leaving a free end to pull when gathering. (Since it was an awkward length, I measured one piece of heavy thread with a yardstick, then used it to measure all the other pieces.) I stitched each length of thread between each set of 2 safety pins marking the one yard sections of my fabric. I sewed onto the right side of the fabric, but I’m not sure it matters.
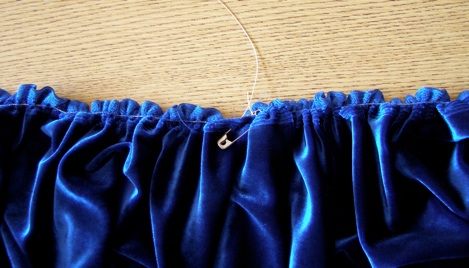 After I had zigzagged my heavy threads onto the fabric, I tied off one end of each thread to the nearest safety pin. Then I pulled on the free end until the fabric gathered down to one foot, tied the thread off to the next safety pin, and evened out the gathers.
Once I had gathered all sections of the skirt, it was time to finish the top. I chose to attach the skirt directly to the table top fabric, but you could sew a band of fabric on top instead. I’ll discuss that option in another article.
Joining the skirt to the top: To prepare the top of this table cover, a single piece of corduroy, I preshrunk it and recut one edge to ensure it was straight. I wanted the excess corduroy to hang over the back of the table, so I needed to determine the placement of the back corner. That corner fell 30 inches (the table width) plus seam allowance from the far (front) edge. Starting at that back corner, I pinned the gathered skirt to the top, matching edges together, and pinning on the gathered side. I used quilting pins, because they were handy, and they worked well. I left the ungathered skirt length (intended for the back edge of the table) loose for the time being.
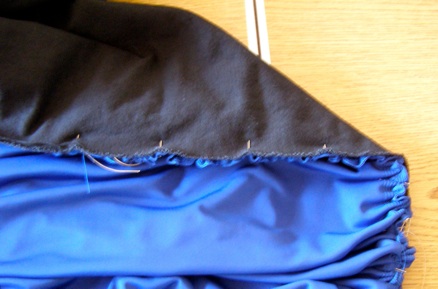 The next picture shows the pinned piece folded over so you can see both sides.
I pinned and stitched only one edge at a time, then draped the cover on a foam-covered table to check corner placement before pinning and stitching the next edge. I used thread to match the skirt, not the top, but I’m not sure it matters.
Besides the corners, these points required extra attention:
• Pull out the pins at the last second, instead of stitching over them.
• Pull out the safety pins, and reattach them in the seam allowance, to anchor the gathered part not yet stitched.
• Check that the corduroy remains flat underneath, without catching extra fabric in the needle. Use a medium length stitch in case you have to rip out several inches of seam to free up excess corduroy caught in it.
If working with a top piece that has extra fabric attached (like fabric destined for an extras table), cut it loose after stitching the front and side edges of the skirt, after double-checking the fit on the padded bell table. This ensures you’ve allowed enough ease, instead of the top cover coming up an inch too short. I hate it when that happens….
I removed the safety pins and gathering twine but left the zigzag stitches in place, since there was no need to remove them. If you used drapery tape, leave the cord in place after gathering. (You may want to release the gathers when you later clean the skirt.)
Originally, I planned to fold over the seam allowance and top-stitch the layers together. However, I didn’t want to top-stitch on the skirt part visible to the audience, and I was concerned about adding bulk (from the skirt gathers) to the flat corduroy side. I decided to zigzag over the seam allowance edge, joining the two pieces of fabric there. This helps me place the cover on the table with the seam allowance flat. It’s easier to deal with as a single edge, rather than having to corral both sides. If you can top-stitch yours into place, even better. If I had it to do again, I would consider enclosing the allowance in something like a French seam.
You could also insert piping or fringe between the top and skirt when pinning and sewing them together. That would introduce a flash of color. It would also hide any color mismatch, like two different shades of black in the top and skirt. I decided against piping so I wouldn’t have to fuss with getting it perfectly straight during setup.
 Finishing the back: I folded over and hemmed the skirt edges, using a zigzag stitch and folding over roughly one inch (twice). Then, with the cover fitted on a foam-covered table, I pinned the top edge of the back skirt into position. Notice that, at this point, I wasn’t matching fabric edges, because the extra corduroy hangs down the back.
 Moreover, I didn’t pin the skirt fabric to the exact back edge of the table. Instead, I angled it down about half an inch. This makes the back of the skirt invisible to the audience, regardless of whether the skirt is placed on the table with military precision. (I had visions of spending time in setup tugging the back of the skirt to get that bright color off the table top.) The pins below mark the edge of the foam, with the back of the table skirt pinned in place and hanging below it.
Hemming: Mark the hem with the covers hanging from the actual tables and foam you plan to use the table covers on. You will probably need to cut off excess fabric after allowing some amount for the hem. On my blue table covers, I left a hem of 4 inches. I didn’t need that much extra, but now I can lengthen the covers if necessary. The fabric doesn’t ravel, so I didn’t finish or turn it under, to avoid extra bulk. On my table skirts made of black crushed panne, I left a hem allowance totaling 2 inches, including 1/2 inch folded under. Sewing the hem with a zigzag stitch is less conspicuous than a straight stitch; it disappears into the drape and texture of the fabric. If working with corduroy, consider mitering the corners. You could also finish the raw edge with trim, instead of adding bulk by hemming.
I hemmed the back of the corduroy table top (on the all-in-one design) and inserted a strand of light curtain weight, to counter the weight of the skirt and smooth out the table top fabric. You can buy curtain weight, which looks like someone inserted BB shot into a piece of string, in the fabric store drapery section.
Next time, I’ll write about a different design, using separate table tops and Velcro.
Copyright © 2013 Nancy Kirkner, handbells.com