See the other articles in this series, especially Table covers – choices, which discusses the most common fabrics used. Also search online for articles and videos about working with your chosen fabric, as well as any sewing techniques you want to brush up on.
Making your own table covers isn’t as difficult as making a wedding dress or a tailored suit. However, you must feel confident making things without patterns. If you hesitate to improvise, mock up the covers in muslin first. Test your ideas and make all your mistakes on muslin, which is cheap. Then buy the expensive fabric and use the muslin version as a model. If you baste the Velcro in place with large stitches, you can remove it to use on the real covers.
 You also need a sewing machine heavy-duty enough for the fabric you’re using, especially considering you’ll be working with large pieces and Velcro, and a large work surface. It was a happy day when I realized I could remove the foam from my bell tables and use them as a work surface for making table covers.
Preparing a shopping list: The materials you may need include:
• Table top fabric – Probably corduroy
• Table skirt fabric
• Thread to match each fabric – Ask the fabric store to suggest threads for the fabrics you chose. Buy the best thread you can get, and err on the heavy-duty side. Get a large spool for the skirt fabric, maybe two. If you intend to attach the skirt to the top, buy only thread to match the skirt. Remember to get serger thread if the cut edges require serging. Better yet, choose fabrics whose cut edges won’t ravel.
• Sewing machine needles – Like thread, ask the fabric store’s advice. Be sure to tell them you need to attach velcro.
• Bobbins – It saves time to wind several when you start the project.
• Velcro to attach table skirts – Be sure to buy both sides (hook and loop). I always use black Velcro, but you could buy a color that matches your fabric. Some people attach the skirt by sticking the foam with pins, either glass-head in a matching color, or T-head pins.
• Seam binding – If needed to hem your fabric
• Drapery tape – If you plan to use it for gathering or pleats
• Heavy thread (like crochet thread) – For gathering, if needed
If you don’t already have pins, a yardstick or measuring tape, scissors, and marking materials (like tailor’s chalk), you’ll need those too.
I like to make my shopping list at least the day before visiting the fabric store, to allow plenty of time. I do all my calculations at home, where I can use a calculator and ponder various ideas. For example, at the same time you make table covers, consider whether you want to make any of the following, and buy sufficient fabric for them:
• Mallet pockets
• Cover for “extras table” – you can put the skirt along three sides, like the main table
• Panel across the back of the bell table for venues where people will walk behind you, like a shopping mall, or a church where the communion rail is behind you. This panel can double as an extras table skirt (for other situations) if designed accordingly.
• Fabric to cover a bell case, making a small display table for props.
• Covered thin foam pad for the organ console or other chancel surface – This comes in handy if the choir or bell choir sometimes plays only a few bells in hand during a worship service (e.g. a peal), and needs somewhere to set them for the rest of the service.
• Bags to store acrylic music risers
• Covers for music binders
• Covers for thin foam to pad shelves, to store bells removed from the table
Consider the possibility that you may expand your set of bells, and will want matching fabric to extend your table covers. One option is to make your table skirt longer than needed (wrapping the extra around the back) and set aside extra fabric for the table top.
You may also want to buy some light fabric to cover the bells before the performance, on the table or hanging as bell trees. You won’t need the same fabric as your table covers, but it should coordinate. It’s an easy project to complete while you have the sewing machine out; just measure, cut, and hem.
Gathers and pleats: Before taking measurements, decide how much fullness you want in your table skirt, and how to accomplish it. For a straight skirt, like corduroy, you’ll just wrap it around the front, sides, and partway along the back (say a foot on each side). Factor in a few extra inches per corner for ease, a couple more inches to finish each edge, and you’re all set.
Adding fullness to the table skirt, through gathering or pleats, creates a more luxurious look. There are many different options for type of pleat, size, and spacing. In choosing the type of pleat, remember that pleats designed to lie flat will be easier to store and transport than protruding pleats. Be sure to ask at the fabric store whether your chosen skirt fabric will take a pleat well. (Some corduroy doesn’t.) At a minimum, knife pleats at the table corners make skirts hang better and look more tailored.
If you don’t have experience pleating or gathering, or your sewing machine lacks a gathering foot, you can use drapery tape, found in the fabric store’s drapery department, or online. Choose a tape designed for the weight of fabric you’re using, to avoid bulk. Buy whatever length of skirt fabric is required (usually 2-3 times the finished length), buy the length of drapery tape that matches the unfinished fabric length, finish the fabric top edge, and sew the tape to the edge of the fabric. Then pull some strings, and the pleats or gathers will fall into place. I’ll talk more about this when we reach that part of constructing table skirts.
Measurements: Here are my assumptions when measuring:
Fabric width – 44 inches to 60 inches – This will work for either a table top or a skirt. If you plan to drape a single panel over the table, without a separate skirt, you need at least 60 inches. 72 inch width, if available, would allow you to drape the fabric all the way to the front, across the table, and with some overhang in the back for balance. (Or you could sew another fabric panel across the back or front for this.) You also need wider top fabric if you turn your tables so they’re 36 inches wide, instead of 30 inches (though this is rare).
Fabric direction – Fabric runs off the bolt along the length of the table. This is the direction corduroy ridges usually run. If the noise of bells scraping on the corduroy bothers you, you can stitch together panels so the ridges run across the table. This may also save fabric, depending on fabric width.
Gathering – A minimum of 2 times the finished length (3 is better). Gather all the way across the front and around the corners. You can save fabric by not gathering the sides, which also allows adjacent tables to fit more snugly together. However, I did this on my first 9’ table skirt, and later wished I’d designed it so I could put the skirt on a 12’ long table when necessary.
Side and back panels – Sides fully covered (gathered or not), and back covered 12 inches in on both sides. The back needs enough coverage for the skirt to hang properly on the sides and back corners; don’t skimp on this.
Velcro – I like to buy different widths: 7/8 inch or 1 inch wide for the skirt and 1.5 or 2 inches wide for the table top. That makes it easier to adjust the table skirt height and make it level, even if you didn’t sew the velcro perfectly straight. I put the hook side on the skirt and the loop side on the table top, so it’s less likely to snag my performance attire. I put Velcro on the full finished length of the table skirt, and on all sides of the table top, which allows me to put either edge in front, and also to hang other things (like a mallet pocket) on the back.
Trim – sufficient length to wrap around the table front, sides, and at least a few inches along the back.
Fabric calculations:
Top – table length plus 18 inches for overhang at ends
Example: (9 foot long table x 12 inches per foot) + 18 inches = 108 inches + 18 inches = 126 inches
126 inches divided by 36 inches per yard = 3 1/2 yards
Skirt – ([table length + (2 x table width)] x gathering factor) + (2 x 12 inches across back) + allowance for ease and finishing edges (say another 12 inches)
Example: Table front and sides = (9 feet x 12 inches per foot) + (2 x 30 inches) = 168 inches
To gather front and sides = 168 inches x 3 = 504 inches
Adding allowance to cover the back plus finishing details = 504 inches + 24 inches + 12 inches = 540 inches
540 inches divided by 36 inches per yard = 15 yar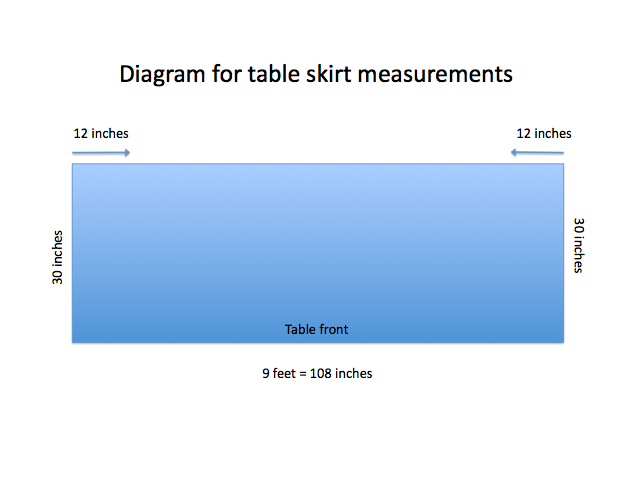 Adding enough for an extras table (3 feet by 30 inches) brought my total top fabric to 5 yards and skirt fabric to 19 yards (without gathers on the extras skirt). At that point, it made sense to buy the entire 20 yard bolt, with a bolt discount. I chose to gather the skirt for the extras table slightly less than the main table, but on 3 sides, because I need to orient the table differently for different purposes. You might prefer to gather only one side, if the extras table is always behind the main table, or not gather it at all. Make sure that works with your chosen fabric. I intended to leave one extras table skirt ungathered, but didn’t like the way the fabric draped, and ended up gathering it.
You could use a gathering factor of 2 or 2.5 instead of 3, or whatever factor your pleat choice requires, or make the skirt completely straight.
Velcro calculations:
Top (2 inch wide loop Velcro) – 2 x (table length + table width)
Example: 2 x (108 inches + 30 inches) = 276 inches
276 inches divided by 36 inches per yard = 7.7 yards – round up to 8 yards
Skirt (7/8 inch wide hook Velcro) – table length + (2 x table width) + (2 x 12 inches across back)
Example: 108 inches + (2 x 30 inches) + (2 x 12 inches) = 192 inches
192 inches divided by 36 inches per yard = 5.3 yards – round up to 6 yards
Sources for materials: If possible, shop locally for fabric, so you can check the color and drape. However, if you can’t find what you need, here are some sources:
Corduroy – Jeffers sometimes sells corduroy (83% cotton/17% polyester) as yardage, currently $17.50/yard. They offer the same colors as their finished table covers.
Velour or crushed velvet – Check costume/party shops as well as fabric stores. In Seattle, I bought velvet-like materials for both of my table skirts from Display and Costume, which does online/mail orders.
Velcro – Best price I’ve found is Seattle Fabrics, which does online/mail orders.
Trims – Jeffers carries trims, which is especially helpful if you want to match Jeffers corduroy.
At the fabric store:
Call ahead to check whether the store currently carries the kind of fabric you’re looking for. It may pay to drive a little further to a “superstore” for better selection. If the exact fabric you want is in stock, ask to have it unrolled to check for cuts, seams, and flaws, as well as to confirm you like the color. Try hanging some of the fabric over the table edge to see how it drapes. Record the SKU and dye lot of what you buy, and ask for care instructions in writing. If you need to special-order fabric, ask for an uncut bolt (there’s often a one bolt minimum for special orders). Or specify the lengths you need, requesting the same dye lot for the whole order.
Ask the clerk’s advice about thread (including type and color matching), sewing machine needles (know the brand of machine you’re buying for), and other notions. To save money, ask for a bolt discount, or a church or non-profit discount (if relevant), or even a senior discount. Ask about any upcoming sales, and whether you can have the sale price now, considering the size of your purchase. Also look for coupons for stores like Jo-Ann Fabrics.
If your budget won’t stretch to your preferred fabrics, you can buy bolts of colored felt and pin it into place on the foam. This won’t allow the same quality of sound as you get from corduroy, but it works. You could also use a fabric like no-pill fleece, with the same caveat. Another advantage to these fabrics is that no sewing is required, since the edges won’t ravel when cut. You can wash fleece, but not felt.
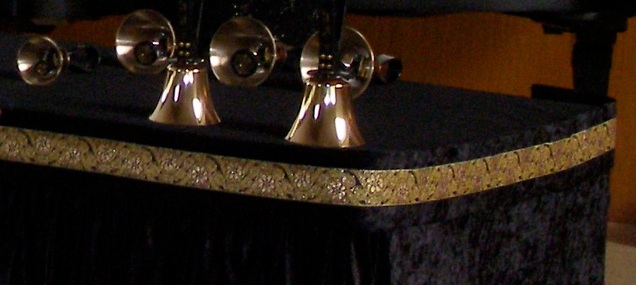 When choosing trims (ribbon, braid, tassels), take a small bell and large fabric swatch with you to the store. It’s hard to match the color of handbells, which are closer to an “old gold” color than the gold ribbon usually available. View it at a distance to see what it looks like to an audience.
Preparing your fabric for use: I like to preshrink the corduroy I’m using for the top, to remove the sizing. However, it’s best not to wash corduroy you’re using for the skirts, since a little stiffness helps them retain their shape. If you’re pre-shrinking table top fabric for a bell choir, you’ll probably find the material easier to handle in the washer and dryer if you cut it to your planned (unfinished) length for each table. For fabric that I’m never going to wash (like the dry-clean-only velour used for one table skirt), I avoid cutting the fabric until absolutely necessary. Though working with a single length is awkward, it’s insurance against a mistake in your calculations. You wouldn’t want to get the table skirt 95% complete and realize it’s 3 feet too short, when you just cut off a couple of yards to use for something else. I was able to gather and finish my table skirts all the way to the point of hemming before I had to cut the fabric.
Corduroy and velvet (including velvet substitutes) have a nap, or pile. That means you need to cut all the pieces with the nap running in the same direction, so it will all look uniform. It’s easier to keep track of the nap if you mark the top of each piece of fabric with a safety pin (or several pins, for a long piece).
Determine the direction of the nap by stroking the fabric along the selvage. The pile feels smooth in the same direction as the nap and rough as you rub against it. The general rule when working with napped fabric is that, if you want the color to look darker and richer, place the fabric so the nap runs up. If you want it to look lighter and brighter, place it so the nap runs down. Since the nap on most handbell table skirts runs the length of the fabric (not across), keep both the top edge and the direction around the table consistent along your set of covers. For example, mark the top edge of the fabric with safety pins before cutting it, to keep track of the top. If you start at the back left corner and pin the skirt in place clockwise around the table top, do the same for all the tables, including the extras table.
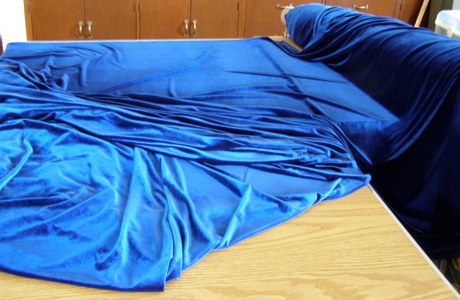
 I found it easiest to orient the fabric by draping part of the bolt in one direction and part in the other direction, side by side over the edge of the table. Standing a short distance away, I could clearly see the right direction for the richer, more luxurious drape I preferred.
In the next article, I’ll write about sewing table skirts.
Copyright © 2013 Nancy Kirkner, handbells.com