Marking music can help – or hinder – music reading. Inexperienced music readers write too much information on sheet music instead of learning to read music notation. Sheet music already contains 95% of the information needed to play the piece. Cluttering it up with English is a crutch, and makes it more difficult to read, not easier.
Start with a clean, legal (i.e. purchased) copy of the sheet music. Don’t expect a struggling ringer to read past someone else’s markings, especially when music is marked for a different station. If you’re a struggling ringer, you may find it worth a few dollars to buy your own copy of the music. You can’t use a photocopy for this, nor can you photocopy music to keep the original pristine while you mark up the copy. Many people believe you can create a working copy if you keep the purchased original in the binder. Although some publishers’ policies may permit this, giving the impression it’s your legal right, it isn’t. When you buy sheet music, you own the piece of paper, but the composition on it belongs to the copyright holder (usually the publisher). Always ask permission from the publisher before you copy sheet music for any reason, unless you purchased a license allowing duplication, or the music is advertised as reproducible. You can read more about copyright law in other articles on this site.
Encourage ringers to take sheet music home to study and mark bell changes (discussed below). Never hand out a piece of music at the same rehearsal you plan to start playing it, unless specifically intended as a sight-reading exercise. For struggling ringers, that approach almost guarantees ingraining mistakes. Advance familiarization saves time and frustration in rehearsal, especially when sheet music is reviewed in conjunction with a recording. You can listen to recordings of many published handbell pieces online at the Jeffers site. In addition, a small business called Ultimate Ring Binder will burn handbell demo recordings to CD for you. You can read more about this service in the article on Recording permission and mechanical licenses, as well as on the Links page. Recordings are an enormously helpful resource, because a struggling ringer can’t look at sheet music and know how the piece should sound, as an expert music reader would.
Other ways to familiarize ringers with a piece:
• Play it on the piano
• Hand out hymnals and ask everyone to sing some verses
• Make up an exercise with all parts playing the melody
• Send a link to a YouTube video of another bell choir playing it
• Send a link to an iTunes version of the underlying melody
The more ringers understand how a piece should sound, the more likely they are to play their part correctly.
Some ringers circle all their notes, or directors may circle notes for them using blue pencil for one hand and red for the other. This is a crutch that, while acceptable for beginners with zero experience, should be abandoned as soon as possible. While reading circles instead of notes, ringers may play wrong notes that are circled and omit notes that should have been circled. They develop circle reading skills instead of music reading skills. Likewise, help them learn to read the beat pattern as a whole instead of writing rhythm counts.
Always mark in light pencil, so a future user can erase it. Even if a copy of sheet music is assigned to the same bells next time, someone else may find your markings distracting. One director I know insists on Dixon Ticonderoga pencils, which are easier to erase, preserving the paper. Avoid indelible pen or highlighter unless the sheet music belongs to you personally, or the highlighter is the special erasable kind. You may want to try Tempo Tape (transparent removable colored tape) for spots like hard-to-read ledger lines.
Encourage ringers to mark signs that fall between staves (like dynamics, techniques, ritards, and the like) closer to where they’re reading. This especially helps ringers reading in the high treble or low bass. First make sure they understand what markings apply to their stems, and which apply only to other parts. Also mark dynamics after a page turn. That way, if you isolate and teach just that page, no one has to look back to check the dynamics still in effect.
In rehearsal, allow ringers time to mark their music as needed. A voice choir can mark music while singing, but a bell choir’s hands are full of bells, and it’s hard to write with gloves on. When the baton goes down, give them a moment to find their own mistakes and make notes as needed. Wait until all eyes are on you before speaking, or you’ll just have to repeat the information.
Ringer setup notes: How many times have you had to stop rehearsal while someone fetches chimes or mallets needed in the passage you just reached? Or you hear wrong notes because the key signature called for F# and someone is ringing F natural? Impress upon ringers that they’re responsible for ensuring their part of the instrument is complete before rehearsal begins. A good way for them to check that is by creating ringer setup notes. At the top of each piece of music, ringers can write:
• Which bells they’re responsible for, underlining the bells they start with
• Which chimes they’re responsible for
• Which mallets they should have at their station
• Any duplicate bells, small percussion, or other equipment needed
Rehearsal marks: Because handbell music is numbered at every measure, it seldom contains rehearsal marks (letters in a box designating the start of each section), like orchestras use. I’m a big fan of rehearsal marks and use them in all my solo pieces. We think of music in sections, so why not label them that way? They’re a very efficient tool for directors to communicate rehearsal plans in advance, and to help ringers understand the structure of a piece. Often two or more sections of a handbell piece are nearly identical, and recognizing the similarities and differences can save rehearsal time and reduce errors. You can read more about this in the Rehearsal marks article on this website.
Bell changes: There’s a saying – never let a note surprise you. Change bells the last time you play a bell, not the first time you play the new bell. Mark an X below the note stem, or next to the notehead, to indicate the change. Write which bell to pick up only if it isn’t obvious from the context. For example, a ringer putting down F natural will almost always pick up F#. In the example below, the D5 ringer will change between D and D# after completing the value of the note. The ringer will need to set down D# to prepare for D natural in the last measure shown below: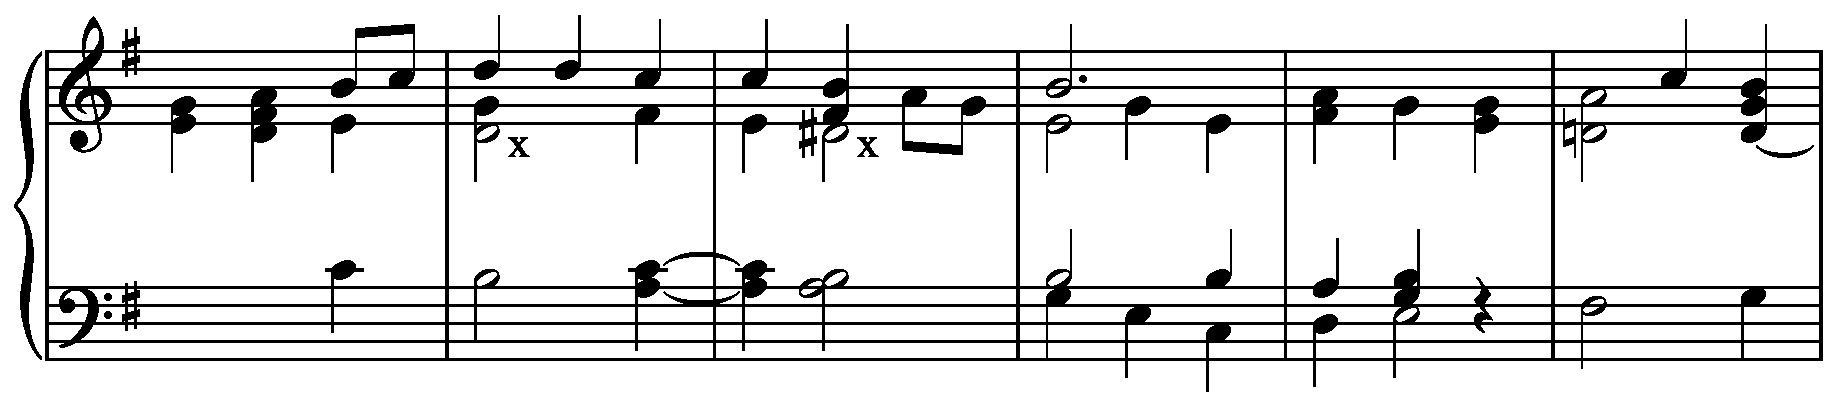
Use the same notation when changing to chimes, and when setting down a bell to pick up mallets.
Repeats: Lines extending from the section breaks surrounding repeats draw your eyes quickly to the navigation. If you have a long way to loop back, especially to another page, write the measure number you’re returning to:

Watch box: Just when the music turns hairy, you need all eyes on the director. Isolate these sections by drawing a watch box:
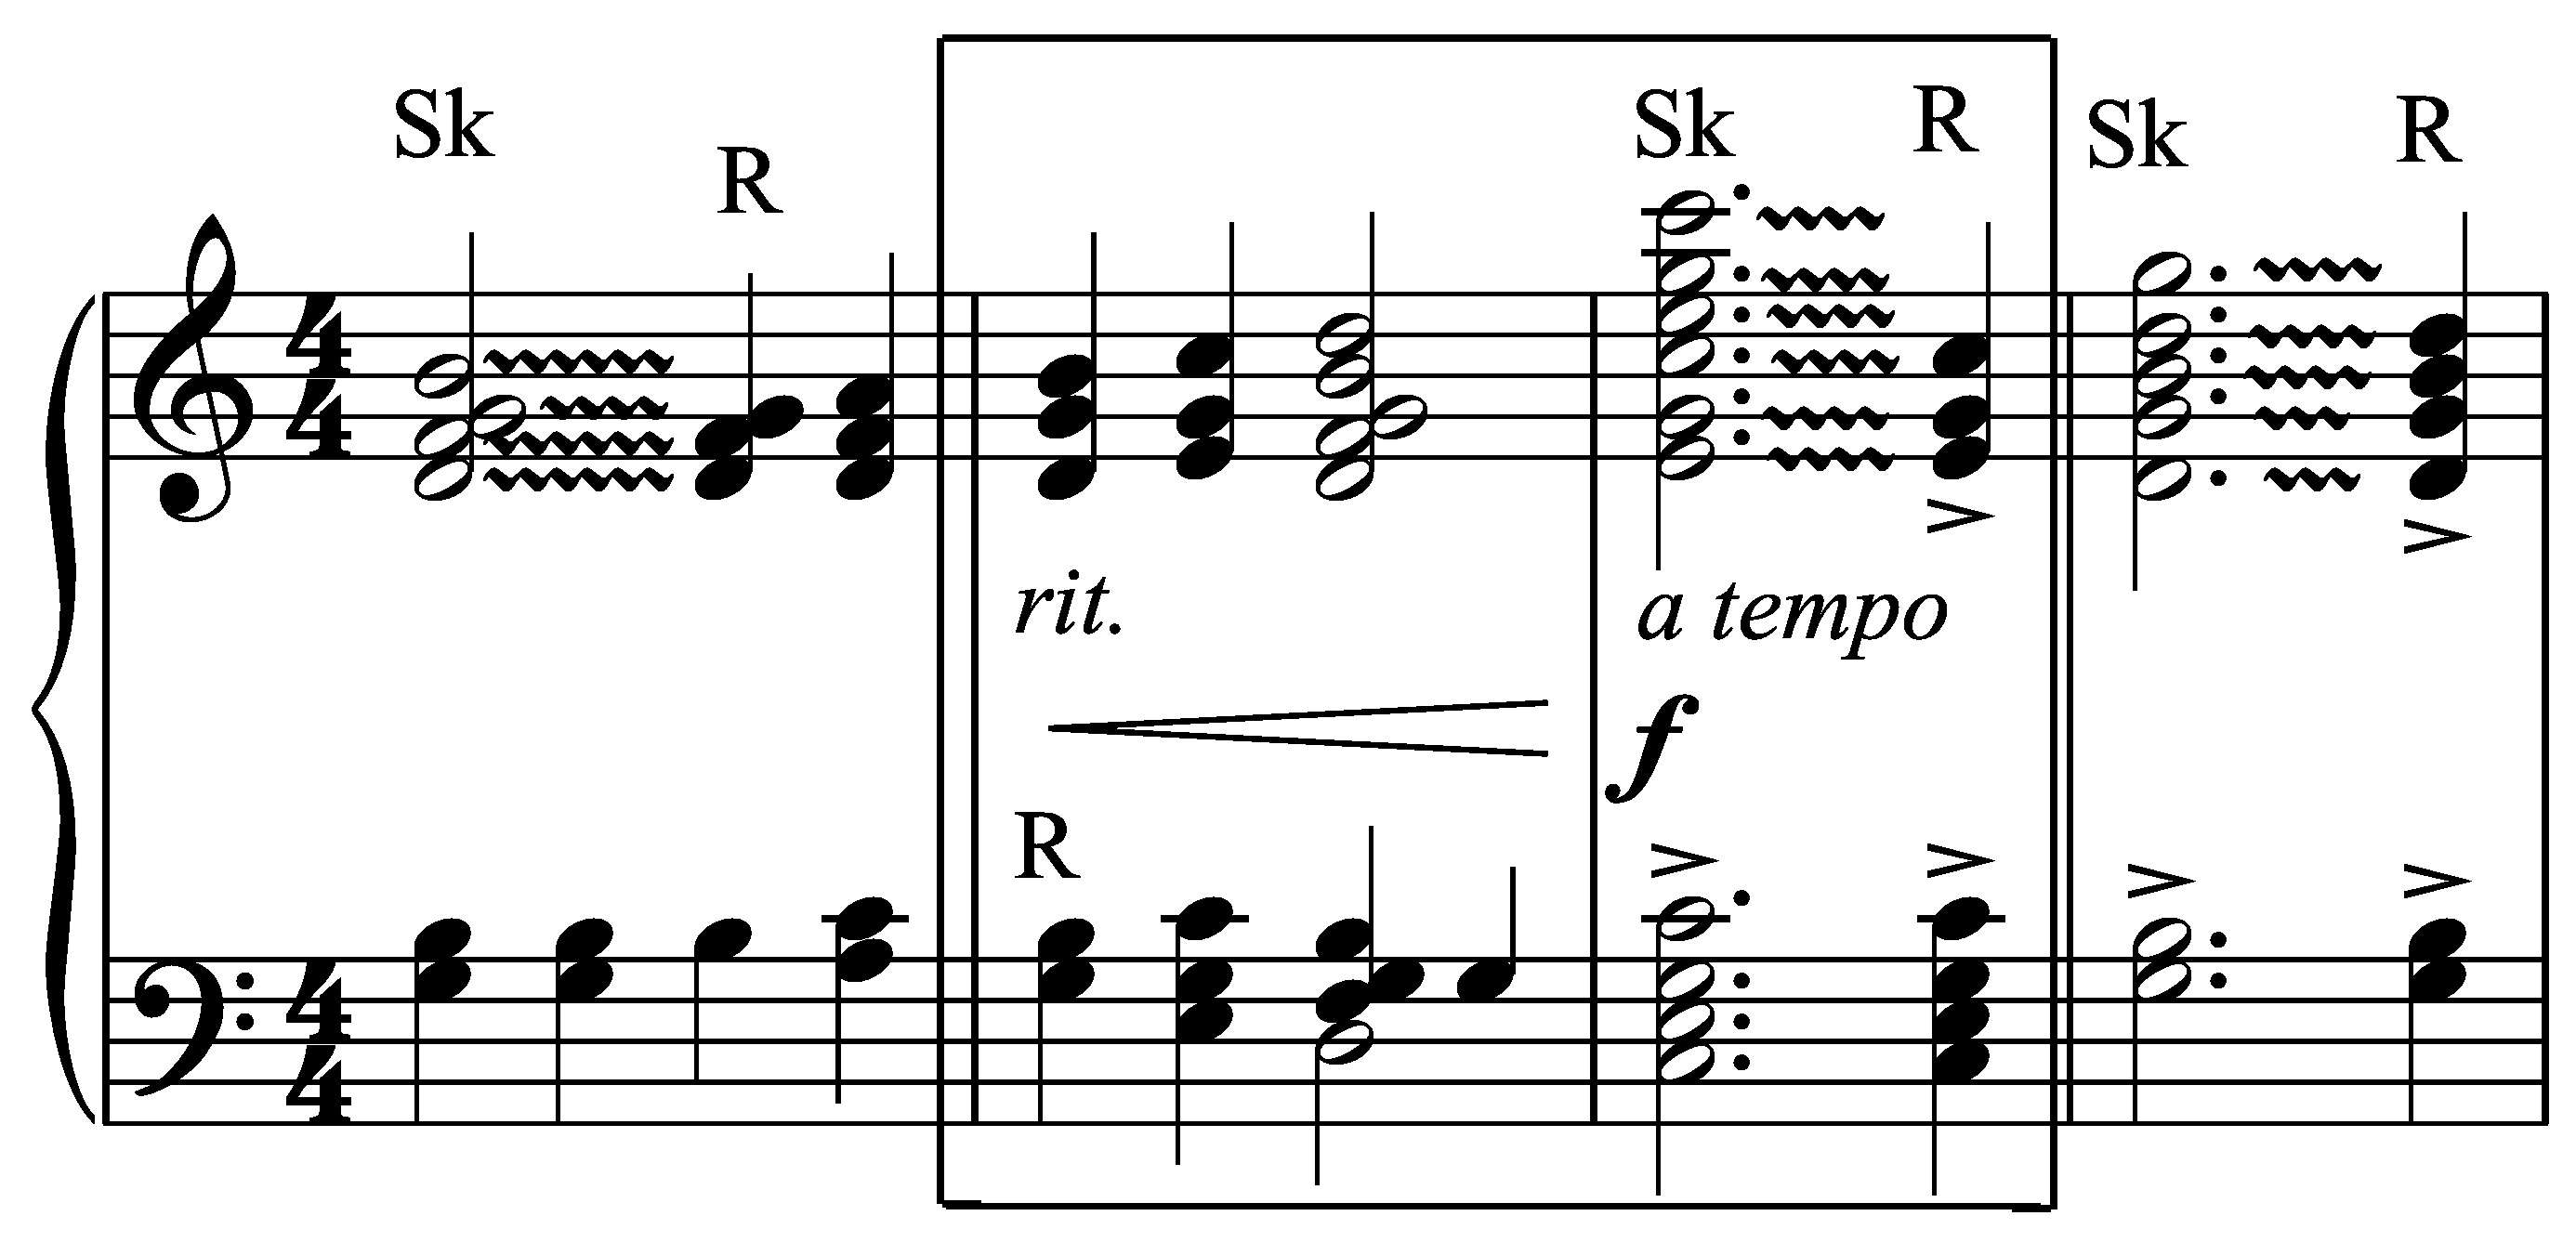
Ringers memorize the part inside the box and watch the director lead the ritard and return to a tempo. When they look back at the music, the rightmost edge of the box guides their eyes to where they resume playing.
High treble doubling: Mark an arrow to alert you to pick up a second bell an octave higher (D7 in the example below):
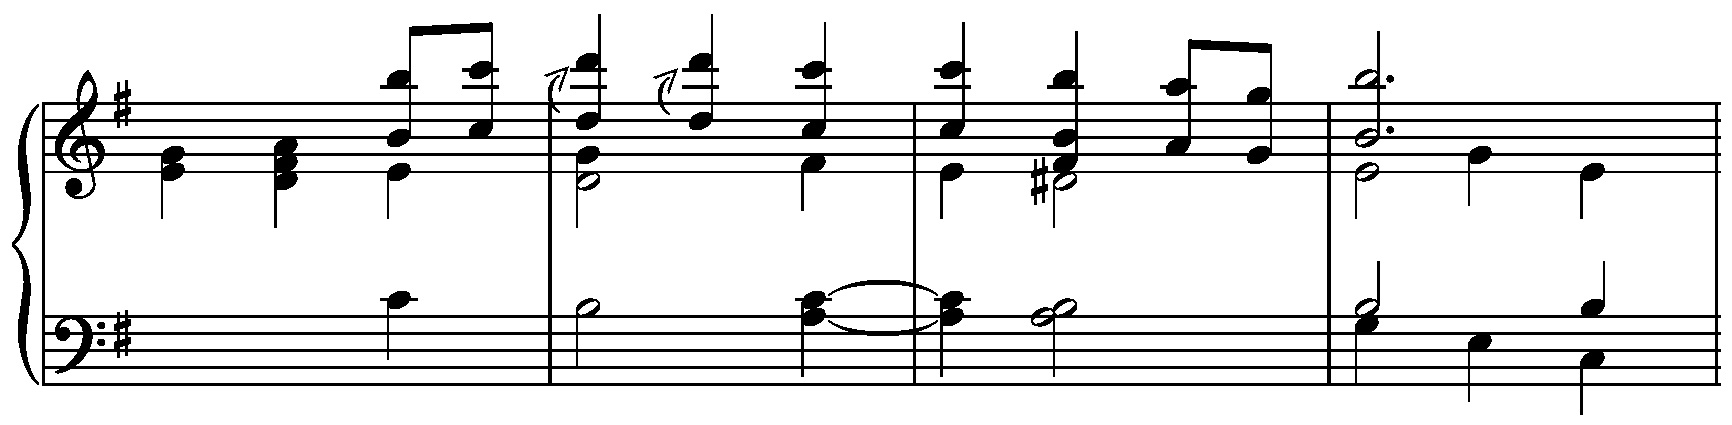
For passages in ledger lines you find hard to read, adding a staff line near your part may help:

Learning correct notation will help ringers remember how to set up 4-in-hand parts:
| Left hand | Right hand | |
| Shelley | G6//G7 | G7\\G6 |
| Ring-and-knock | G6/A6 | A6\G6 |
Where G6 is the primary (“top”) bell.
Other markings: If you need to pick up a bell with the “wrong” hand, for example while weaving or to start a solo/ensemble phrase, mark lh or l for left hand and rh or r for right hand. Use lower case to avoid confusing r with R (meaning ring). On tricky page turns, note when you turn the page and with which hand. At the bottom of the page, pencil in your first note after the page turn.
Ringers should also mark any interpretive signs the director requests, like breath marks, additional fermatas, etc. Don’t make the mistake of thinking you can remember all these. Amateurs rely on memory; professionals write things down. Your prompt compliance will allow the director to move forward in every rehearsal, instead of repeating the same instructions.
When playing multiple pieces back-to-back, as in a concert, put a post-it note at the end of the last page reminding you what happens next. That’s especially helpful if bell choir pieces are interspersed with other offerings, like a choral piece or solo.
The music owner can stamp every piece of music with identifying marks, like the name of the church. Most office supply stores will make custom self-inking music stamps. If you use standard positions, also mark music with the position number. Traditionally, in bell choir music, C4 D4 is position 1, E4 F4 is position 2, etc., up to B6 C7 at position 11. If you have more than 3 octaves, treble bells above C7 are assigned to the ringer with bells one octave below (e.g. D7 to the D6 ringer). Some choirs create a position 12 for certain high treble bells. Below C4, positions are labeled high bass (G3-B3), low bass (C3-F3) and sub-bass. Bass positions are reconfigured to meet the demands of each piece. If you start labeling music with 1 as the lowest bass position, you either lose that flexibility or create inconsistencies as you move up the choir.
Small ensemble positions are numbered from the top down, with 1 as the treble part, 2 the alto, 3 the tenor, and 4 the bass.
Next time, I’ll talk about ways a director can set ringers up for success.
Music underlying the watch box example was taken from ‘Music of the Masters’ arr. Sharon Elery Rogers, Copyright 2008 Choristers Guild. The copyright notice contains this sentence: “Permission is granted to the original purchaser of this book to duplicate as needed.“ I highly recommend this book of Level 1 and 1+ material for teaching, especially sight-reading practice.
Other examples were created from material in the public domain, or with permission of the copyright holder.
Copyright © 2014 Nancy Kirkner, handbells.com