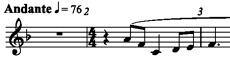
Over the last 4 months, I’ve been writing here about the principles and techniques that allow us to choreograph music for solo bells. In this example, I’ll walk you through a piece and explain my thought process and the decisions I make. There’s no single right answer to choreography; there’s only the solution that makes most musical sense for an individual musician. I’ve chosen this example specifically for the problems it presents and the variety of techniques employed in my solution. A typical solo would be less complicated. There’s a video of the entire piece at the end, and I’ll walk you through the score in sections.
• The piece is “Aurore” by Gabriel Fauré, op. 39 no. 1.
• It starts in 4/4 time in the key of F. Bells used range: C5 through F6.
• Bells on the table are always in home position in keyboard order, unless specified otherwise.
Let’s get started:
 • Move C5 into the space over E5 and F5 to make it easier to pick up with the rh (right hand).
• Start the piece with A5 in the rh. You can pick it up either before or during the piano introduction. If the phrase moves down, you generally start with rh. If it moves up, start with lh. Always try starting a phrase first with one hand, then the other, to see which works best.
• As the phrase moves down and then up, both A5 and F5 occur twice with an odd number of unique bells between the two occurrences. That means each bell will be played with the same hand both times, so either or both could be a constant. Making both into constants would mean clashing castings while picking up D5 and E5. I would probably return A5 home and favor F5 as the constant. It’s closer in size to the bells paired with it, making the pair easier to manage when the smaller bell is in primary position.
• F5 could instead be displaced by removing Eb5 and using that space temporarily for F5. Since I have small hands, I limit the amount of T4iH with bells this large, and I will later learn that I want Eb5 moved for another reason. I choose displacement.
• Instead of returning F5 home, reverse E5 and F5 while setting each down. It will help to have them in each other’s spaces while replacing them and again the next time both are played, as you’ll see in m. 5.
• In m. 2-3, that scale will be hard to weave musically. Bring in the top bell (D6) and place it over B5 C6; note that as a preset.
• To avoid weaving, hold G5 constant in rh. After picking up C6 in the same hand, set the pair down together. G5 could stay in hand, but I prefer to scoop it off C6 when I need it again in m. 4. Try it both ways, and see which you prefer.
• In m. 3, it looks like A5 could be constant in lh. However, that means picking up D6 and Bb5 with hands crossed. Instead, hold D6 constant in lh and set it down paired with A5. Return D6 home during the half note in measure 4. Since it’s on top of A5, not under it, it’s easy to pick up and replace with the free rh.
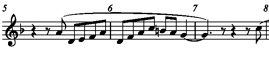 • In m. 5, an odd number of unique bells separates the two occurrences of A5. A5 could be held constant in rh. To avoid the risk of clashing castings, I return A5 home instead. D5 could be a constant for the same reason, but it’s a large bell to hold while picking up F5.
• Restore E5 F5 home while damping each on the table. (We had reversed them in m. 2.)
• At end of m. 5, restore A5 home. The next time it’s needed, it will be in the other hand.
• In m. 6, ring F5 in rh. Set down above B5 C6. It will be easier to damp now, and easier to pick up the next time it’s needed, at m. 8, if it’s further right.
• From m. 6 until m. 8, C6 could be constant in rh. It’s a little awkward picking up B5 and A5 while ringing each bell at the proper height. I prefer to set down C6 and pick it up again during m. 7, where there’s plenty of time. The second half of m. 6 may be a little choppy, but that’s better than clashing bells. Smoothing out a legato line can be practiced, but bells clash whenever they want.
• Instead, I hold B5 constant in lh. That way, it’s moving to the left to pick up G5, keeping out of the way while I pick up A5. There’s plenty of time in m. 7 to replace B5.
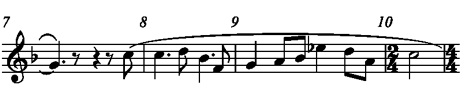 • Notice the overlapping m. 7 in this system, so you can see C6 repeated.
• Ring C6 in rh and pass to lh during the repeated note. That frees rh to pick up D6.
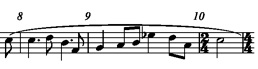
• In m. 8-9, note the odd number of bells between the two occurrences of Bb5, and hold Bb5 constant in lh.
• Use rh to pick up F5, which is currently above B5 C6.
• Pick up G5 in lh (secondary to Bb5), then return F5 home.
• In m. 9, an odd number of bells separates the two occurrences of A5. Keep A5 constant in rh. Note that I could have chosen to keep D6 constant during 8-9 instead. In general, I prefer to choose a constant the same size or larger than those I’m picking up. D6 is just a little too small.
• In m. 9, replace Bb5 home and hold D6 constant.
• Set A5 above B5 C6.
• In m. 10, we hold D6/C6 in rh, and the lh free.
• Pull out D6 with rh. Read about this in Shelley plus and minus.
• Switch C6 from the secondary position to the primary position. Now the constants are C6 lh and D6 rh.
 • Pick up F6 secondary rh and E6 secondary lh. This allows us to alternate hands during the next part.
• Play down the scale, returning F6 E6 D6 C6 home after ringing each.
• Because A5 is above B5 C6, it’s easy to pick up with rh. Otherwise, we might hold C6 until after ringing G5, to avoid crossing hands. Then we would need to return C6 home in m. 13.
• Pass C5 from lh to rh on the repeated note. That frees lh to pick up D5.
• At m. 13, note the change to 3/4 time.

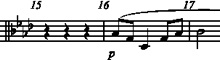
• At m. 15, note the key change.
• During m. 15, position Eb5 above B5 C6 for m. 29.
• Pass F5 lh to rh, or put it down and pick it up with the right hand, during the rest.
• At m. 16, note the similar shape to m. 2 (in the system repeated below it). That implies the pattern should be played the same. However, it means reaching across myself with rh toward the left and lh toward the right, twice.
• Instead, using the same constants, I switch hands. Ab5 is in lh and F5 is in rh.
• Knowing this, let’s look at changing the earlier choreography to match. Problem: A5 needs to change hands. Starting with A5 in lh, setting it down to the left, and later needing it in rh, creates a bigger problem than it solves. It’s better to play these two sections differently.
• In m. 16, damp C5 in F5 space. That will make it easier to pick up in m. 18, then it can return home.
• At the end of m. 18, return F5 home. Continue to hold Ab5.
• In m. 19, passing C6 is an option. If you do that, you would need to displace Fb5 (E5 bell) toward the right earlier, to pick it up in rh at m. 21.
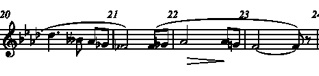 • In 20-22, notice the mirror image pattern starting on Ab5. This is another place to use traveling four-in-hand. Continue holding Ab5 constant in lh. Shoulder damp Gb5 after ringing, because it will ring again immediately in the same hand.
• In m. 20, it may be a little awkward to pick up Bbb5 (A5 bell). It helps to step to the left during the dotted quarter note.
• In m. 22, I could set down Ab5 and pick up F5 in lh. Then, in m. 23, I could pass F5 from lh to rh. However, I have plenty of time during the half note to pick up F5 over G5 in rh (G5\F5). That allows me to continue holding both Ab5 and F5 constant into the next section, table damping and releasing G5 in m. 23.

• In m. 24, note the similarity to m. 16 (in the system repeated below it); the same bells are used, and only the rhythm changes. Play the two measures with the same choreography, holding Ab5 constant in lh and F5 constant in rh. (This is the reason we passed F5 in the previous section.) Return F5 home before the end of 24, because what follows differs.
• In m. 26, lh will pick up F5 as secondary to Ab5 (Ab5/F5).
• Set down Ab5 instead of holding as constant through m. 27. It’s easier to damp B5 cleanly on the rest if it’s in primary position.
 • Note: m. 27 is repeated here because the next phrase starts during the measure, on beat 3.
• In m. 28-30, note the similarity to m. 20-22 (in the system repeated below it); the notes are a half step lower. Play the two measures the same way, with Ab5 constant in lh, and shoulder-damping F5 in rh.
• In m. 29, note that rh will pick up Eb5, which was set above B5 C6 in m. 15. This bell could have been placed above Gb5 Ab5 in the third row. I find it easier to pick up on time from the space above B5 C6. There’s time at m. 15 to pick it up from its home position and put it there, and by that point the space is empty. However, it’s easier to preset Eb5 on end over B5 C6 space while other bells are using it. Then you can just lay it flat when the space is available.
• At the end of m. 29, return F5 home.
• During the half note in m. 30, pick up Bb5 in lh secondary to Ab5 (Ab5/Bb5). That keeps rh free to pick up C6.
• During the long note at m. 31, table damp Bb5. Return Ab5 home. Put Eb5 on end again, just to get it out of the way. Set D6 in space above B5 C6. (Do the steps in the order indicated, to avoid clashing bells.)
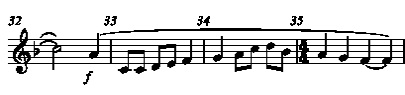
• Here we are back at the beginning of the piece. It may not be obvious at first, because the beginning is in 4/4 time and m. 32 is still in 3/4 time. Also, because this is a song with words (and syllables), some parts have a slightly different rhythm. In particular, there is no F5 near the beginning of the phrase. I could start with A5 in rh and pass C5 on the repeated note. However, the forte dynamic and energy of the piece make me want to avoid that distraction, and I end the prior section with lh free. Start with A5 in lh, and place it in the empty space next to C5 (that is, where D#/Eb5 belongs). Pick up A5 in lh in 34 and return it home.
• Play the rest of the system like m. 2-4.
• At m. 35, note the change to 4/4 time.
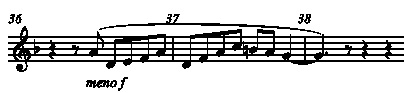
• Note that m. 36-38 is nearly identical to m. 5-7. Play these two sections the same. Exception: in m. 37 (beat 4), place A5 over F5 for rh (F5\A5), for m. 39.
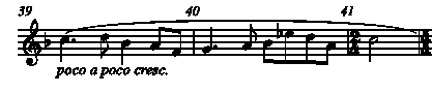
• Note that m. 39-41 is identical to m. 8-10. Play these two sections the same. Exception: in m. 39, ring A5 over F5. Return F5 home, but continue to hold A5 constant in rh.
• In m. 41, set A5 above B5 C6.
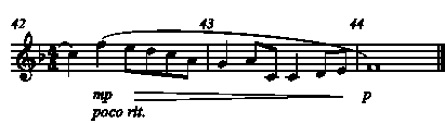

• Again, m. 42-44 is nearly identical to m. 11-13, and can be played the same way. The only rhythmic difference is G5 in m. 12, which is a quarter note instead of repeated 8th notes, reflecting the underlying words. I find it easier to pick up C5 if I damp G5 to the left of it, instead of home.
• Since this piece is about sunrise, I end it by lifting F5 very, very slowly in a straight line, finger damping at the end of the piano part. I continue holding E5 in the other hand, down at my side, to avoid the distraction of returning it home while concentrating on the F5 bell.
The best way to learn choreography is to plunge in and try it. Take a piece you’re learning, and come up with 3 different ways to play it, or at least a section of it. Evaluate the pros and cons of each approach. You’ll make lots of mistakes, and your early attempts probably won’t be as good as the published choreography. Over time, though, your choreography skills will improve, so you can branch out into works written for other instruments and help build the solo handbell repertoire.
A video appears below. Click on the lower right corner to watch it in YouTube, where you can enlarge the viewer. Note that the table is also set for Clair de lune – Menuet, which I play immediately after Aurore in the same set.
Copyright © 2012 Nancy Kirkner, handbells.com