The standard range for bell tree pieces using current methods is G4-G7. It’s possible to play with a much smaller range, and you could start with C5-C7 or even fewer bells. For example, the popular ‘Symphonia on Hyfrydol’ uses only C6-D7 (with F7, which could be left out) in the solo version of the bell tree part.
When starting out, you’re unlikely to have much choice in brand of bells, because you’re probably borrowing the set from the choir you normally ring with. Malmark bells are harder to use because the castings are slightly larger than Schulmerich bells, which makes them more likely to touch. The handles are also wider, which makes it more difficult to use wire clips, which I’ll discuss below. However, the tuning, with fewer overtones, may produce a stronger fundamental sound.
I use Schulmerich bells bought in 2007. They work well, but the handles on bells of that vintage are more flexible than older sets, and will stretch out over time. Older Schulmerichs have stiffer handles, so they’re less likely to need supporting clips – but more likely to swing. I prefer Schulmerichs for their tone color, plus the setup looks more elegant with all black handles, and I bought them to match the set I use for table solos. I’ve been told that Whitechapels have a stiffener in the handle that prevents interlacing. However, you can buy up to a 4 octave range of Whitechapel cup bells designed for malleting. Whitechapel also sells racks for their cup bells. Petit and Fritsen bells don’t work, both because they have a similar handle to standard Whitechapels and because I‘ve heard you’re not supposed to mallet them.
The next item you’ll need is a bell tree stand. While it’s possible to make a stand, or use something else like an IV pole, I don’t recommend it. The way I look at it, if I’m going to hang thousands of dollars worth of bells, I’m going to invest a couple hundred dollars on something proven. I once made some PVC stands to teach a bell tree class; it was more expensive than I expected, and the stands couldn’t be trusted not to spill bells onto the floor. The bell tree stand from Jeffers is very stable and worth every penny. (This is called a Peery stand, because Peery Products used to produce them before going out of business.) I have two of them, one for practice, and one packed for concerts. You can also transport the stand mostly assembled, just removing the arms. Though you might make your own stand if you have the right equipment and skills, you’re unlikely to find someone to build you one in metal for less than Jeffers charges.
Christine Anderson owns a bell tree stand that she had made in wood, which breaks apart into sections for travel. It looks like it would be ideal for treeing up small bells, but perhaps not bells below C6. It would be much more practical to fly with her stand than a Peery stand.
All my advice assumes you’re using the Peery stand. For example, if the arms of another type of stand are the wrong diameter, the bells are likely to swing, and the methods I suggest to correct that won’t work.
I bought both my stands at handbell events within driving distance. By calling ahead to the vendor, I saved the cost of shipping. You do need to call ahead, though, to ask them to bring one for you; don’t assume they’ll bring bell tree stands, or that they’ll have one left when you show up. The stand consists of a base with casters (wheels), an adjustable height pole, and two arms. If you use my setup, you’ll need to buy an extra arm. Even while using another setup, I found the extra arm handy for parking random strands of bells.
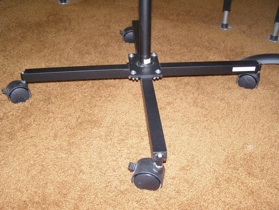 Notice that the wheels have a locking mechanism (the small tab), which is helpful if you’re placing the stand on a slick surface, like terrazzo. Remember to unlock all of them if you want the wheels to roll. Note also the leveling mechanism: the wheels (or feet) screw into the base, and the height of each can be adjusted separately. I use a spirit level to confirm the stand is level when loaded with bells.
 The pole is easy to attach to the base with wing nuts screwed onto bolts. I tighten them by hand part of the way, then use a screwdriver. It helps to have all 4 corners fastened loosely before tightening any of them. You’ll also need a free hand to hold the pole upright until it’s secure.
At right is a picture of the arms (4 shown here) attached to the pole with wing nuts. Notice the small metal plate that goes around the rod to give the wing nuts something to grip. Below the arms, you can see where the silver inner rod comes out of the black sleeve of the outer pole, separated by the white plastic ring. This is part of the adjustable height function.
You’ll need something to keep the bell handles from sliding down over the handguards. Some soloists buy larger handguards to install directly on the bells, and that solves the problem. This tends to work better with Malmark bells. The Schulmerich people dissuaded me from ordering bells with larger handguards, because they won’t fit in the standard bell cases. If you’re using your tree bells for table work, it’s also harder to finger damp with larger handguards. Of course, upsizing handguards is feasible only if the bells belong to you.
You can buy collars that look like the plastic disks separating clothing by size at retail stores. Some soloists use those actual disks. The disadvantage is that the strands tend to twist around the collars. I use wire clips designed for C6 and up. Note that if you have Malmark bells, especially older ones with wider handles in the treble, they will stretch out the clips. I suggest buying 3 or 4 packs (of 5) to have enough clips to put on every bell. While not strictly necessary to separate all the bells, the clips tend to stabilize the strand, and also push the bells outward and upward. That makes the strand shorter, and overall makes bells easier to hit accurately.
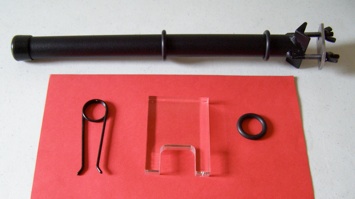 For bells below C6, you can buy plastic (acrylic) clips. Jeffers sells them in a set of 3. The set I bought came with two long (for Schulmerich) and one short (for Malmark). The short clips don’t work with Schulmerich bells, and I don’t know whether the long clips work with Malmark. You may want to specify all clips of the same size, if you buy a pack. The clips are expensive. You can buy one of the size you need, then take it to the local plastics shop to have duplicates made, using it as a pattern. If you feel comfortable working with acrylic, you can make your own. If you have Schulmerich bells, you can also order from the company that made my clips, Clear Cut Plastics in Seattle. They kept the template on file under my name. Allow at least a month to receive them; the plastics shop doesn’t stock them, but makes them to order. Jeffers stocks them, if you need them right away. You can make wooden clips and paint them black. The advantage of the plastic clips is that they’re invisible to the audience.
I have enough clips for every bell in the range, but I tend to use them only for the top bell in the strand (to compensate for the weight supported by the topmost handle) and if I have a problem with bells touching. I suggest you buy 5 or 6 acrylic clips to start, then order more if you need them. The plastic clips will chip, especially if stressed under load. (You can still use them.) I like to insert and remove them either with the bells lying on the table, or while supporting the weight of the bells with my free hand.
The bell tree stand also comes with black rubber O-rings. I didn’t know what these were for until I took the stand to Victoria to play solos using borrowed bells. The older bell set had stiffer handles, and the trees started swinging in rehearsal. I sent an SOS to some bell tree people, but (because I was traveling) I didn’t have many of the things they suggested. I decided to try the O-rings, mostly because that’s what I had with me, and mirabile dictu, the trees stopped swinging. That’s when I figured out what they were for! Place them on the arm at the edges of the upper handle loop, snugged up against the handle. I also use them to mark the spacing of the handles on the arm. The vendor has changed the thickness of the O-rings provided, probably because the thicker rings are harder to slide the handles over. I tend to use the thicker rings on the far inner edge of arms, to mark the backstop for the innermost handles. I use the thinner rings (which came with my newer stand) to mark the placement of handles further out on the arm. When you order your stand, ask for the thinner O-rings.
Prices from Jeffers (as of 2017, before shipping and taxes):
Bell tree stand with 2 arms and 4 casters – $349
Extra arm – $39
Wire clips – $17.50/pack of 5
Lucite clips – $25 for a pack of 3
The acrylic clips from Seattle Plastics are around $90 for a set of 12. Smaller orders would be close to that price, due to a minimum labor charge per order. You might want to split an order with a friend, or buy extras in case you end up teaching classes.
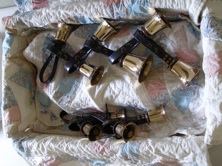
 Here you can see the clips deployed, and also detail of how the bells are looped together and hung on the stand.
The top bells closest to me (B5 and Bb5) are supported by acrylic clips placed under the handles of the bells below. As you can see, they’re nearly invisible. On the far left, you can most clearly see the wire clips on G7 and E7 below it. The prongs go around the handle block, with the loop facing the outer end of the arm. The Peery clips come with a diagram of how to deploy them.
I prefer to tree up bells while standing at the padded bell table. Over time, you can become proficient at doing it in the air, but it’s easier at the table. If you haven’t ever treed up bells before, notice that you’ll have to rotate each handle a quarter turn while looping it through handle of the bell below it in the strand. Then re-align the handles. The topmost bell handle on every strand remains turned sideways, so the loop will hang on the arm. You can see the alignment of bell handles in the photo above.
I place the “ring side” of the handles facing away from me. That means I’m malleting at the same point on the casting that the clapper strikes, which is the point of purest tone. (Look inside your bells, and you’ll see a line incised there. That’s called the strikepoint, and the bell manufacturer marks it while tuning the bell. Then everything else on the bell is lined up so the clapper hits that point.) You can play them with the other side facing you, but you may notice a difference in the sound.
When you first work with bell trees, you’ll spend time figuring out which direction bells “point.” You need to think of this twice: when treeing up the strands, and when placing the strands on the stand. I find it easier to think of from the bottom (the first bell looped into the strand) while treeing them up, and from the top when hanging them on the stand. In my configuration, all the bottom bells point left, except for the little strand with the sharps in the 7 range. The top bells point left at B5 and Bb5, and right on all the other strands. One advantage of keeping bells treed up is that you don’t have to think about how they point every time you want to practice. In performance, you can sort out any hanging errors during the warmup.
For more information on bell order, see my article on bell tree basics.
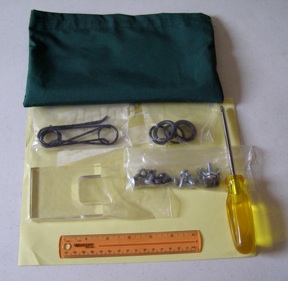 I bought a Phillips head screwdriver, small ruler, and extra fasteners for the bell tree base. I carry them in a small bag stored with the concert bell tree stand, along with extra clips and O-rings.
I include a diagram of which arm goes where, and how high. You can measure this either from the point where the inner rod emerges from the outer pole, or from the top.
The pole is adjustable height with 4 settings at 4” increments, and you may want to note which notch you like to use. I’m 5’3”, so I set the pole at its shortest setting.
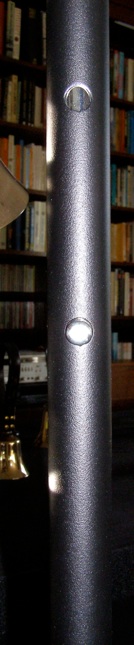
Two small tips: 1) When pulling out the inner rod, pull straight out, not with a twisting motion. Otherwise, you’ll lose track of the button that locks into a hole in the desired position. You can take a felt pen and draw a black line around the inner rod at the level of the button, so you can keep track of it as it moves past each hole.
 2) Be careful when collapsing the pole that you don’t push the inner rod too far. (Mention this to anyone helping you put away your equipment.) The inner rod is supposed to go a certain distance, then lock into a stowage position. It’s possible to push it past this point, then you can’t pull it out. If this happens, you can use a rubber mallet to pound it out from the other end. Don’t ask me how I know this.
In the photo, you can see the positioning holes for the adjustable inner rod. The lower one has the pushbutton that locks the rod in place.
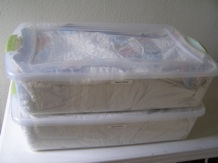
When driving to a venue, I transport the treed-up bells in locking plastic boxes with padding I made by cutting up an old quilt and binding the edges with fabric tape. (You could use thin towels.) This goes between layers of bell tree strands as well as all around them. I can transport the range C5-G7 easily in two of these boxes, along with the mallets, light fabric cover to place over the bells after setup, and the gloves I wear while putting bells on the stand. This is much faster than disassembling the trees, putting bells in cases, and reassembling at the venue. One box has all the outer strands (naturals), and the other has all the inner strands (sharps and flats). That speeds up packing and unpacking; everything goes into the box as it comes off the stand, and goes back onto the stand in reverse order. Notice that I’ve placed every casting so it touches only plastic or fabric, not metal.
Layers of bells:

Both boxes packed and ready to go:
I also designed and sewed bags/covers for transporting the bell tree stand base, pole, and arms, which I’ll write about another time.
Place the stand in the general area where you want it before loading it with bells. Put it somewhere that it would be impossible to trip over. At one venue, I placed it in what I thought was an out-of-the-way spot while waiting for my part of the program. The same person tripped over it not once, not twice, but three times, nearly knocking it over once. Bell trees aren’t like wind chimes; it’s not OK for the bells to clang together.
I usually position the stand so my left shoulder faces the audience when I’m standing at the center arm (C6-C7). That way, the audience and my accompanist can generally see and hear me, as well as the bells. You might try different orientations, depending on the position of the piano and which strand you’re playing most. Next season, I’m playing solos in a concert in the round, and it will be interesting to see whether bell trees solve the problem of having part of the audience behind me.
If you need to move the stand with bells hanging from it, make sure the wheels are unlocked and pointing in the right direction, and try to get someone to help you. It’s easier to move by pulling on the pole than pushing, and by positioning the strands so they’re parallel to the direction of motion. That way, if they swing, they’re less likely to hit each other or the pole. I’m planning to make fabric panels to hang between the strands while moving the setup, but don’t have anything to share about that yet.
If you live in earthquake country, consider taking the trees off the stand after every practice session. I padded the shelves of a closet to store unused bells, still treed up. It’s especially important to remove the heavier bells (below C6) so they don’t stress the handles of the topmost bells. If you stop working on bell trees for an extended period, unloop the strands and put the bells on end so they tarnish evenly.
When I first started working on bell trees, I brought the church’s bells home over the summer, with permission, of course. I found I made faster progress leaving the bells treed up and available to practice in short sessions, instead of having to set them up every time I wanted to work with them, then disassembling them to practice table solos. In the fall, I returned the bells to the church, and found a church with “closet bells” they were willing to lend me for Christmas concerts. During that time, I ordered a second set of bells so I could have them for bell tree work. I justified them partly because I needed duplicate bells for table work, and it seemed more logical to me to buy a full set that would have resale value, instead of random bells. However, this now means a lot of extra work polishing bells every year, not to mention a lot of money tied up in them. Fortunately, used bells that have been well cared for are in great demand. With resale prices high as a percent of retail, coupled with regular price increases from the manufacturers, I expect to sell my sets someday for close to what I paid for them.
Over time, the set that I’ve left treed up has developed “hardening of the clappers.” If I had it to do again, I would rotate the sets between tree and table to prevent this. I might also try to buy a set without a G#4, which is never used in bell trees and seldom used in handbell solos. And I have two of them! But if I were to sell my bells to a bell choir (instead of another soloist), they would want a complete set of the same vintage, so it’s probably just as well I have it. Another thing to consider, if you’re buying a set of bells specifically for tree work, is to keep the castings, handles, and handguards, and use fasteners from the hardware store to assemble them. Then sell or give away the clapper assemblies. (Obviously, if you did this, you couldn’t use them as duplicate bells or resell them without buying the clapper mechanisms later.) You wouldn’t need cases, either, if you use the transport method I described. You might not even need handles and handguards, if you were to buy (or have made) a rack that looks like this:
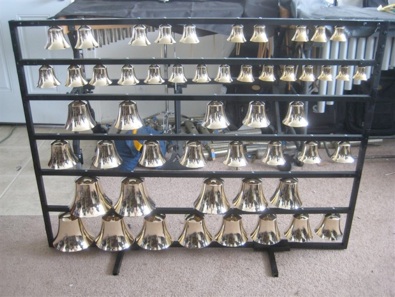
I don’t know where you can buy this kind of rack, but I imagine a metalworker could build one for you. I saw this setup listed once online, for sale complete with Malmark bells C4-C8. It included a duplicate C5 and C6, at the top and bottom of their respective octaves. I’ve seen similar setups listed online that were once part of vaudeville acts. It seems most appropriate for a fixed venue, as it looks awkward to transport, and you would need a sturdy table to set it on. Schulmerich informed me they don’t sell castings alone; only someone on record as owning their bells can buy castings, e.g. a replacement for a damaged bell. You might find a set badly in need of refurbishment, and salvage the castings for a setup like this.
Malmark sells something a bit like this, calling it Cymbells. It’s quite expensive, about $1000 per chromatic octave, including bells and stand. Bells C5-C8 are available (though G4-G7 would be more useful, in my opinion). It certainly adds some variety to a group concert. However, as a soloist, I feel it would be a lot of money tied up in an instrument with limited use. I couldn’t play an entire concert on it, and it would be too much to add to the long list of equipment I already schlep to a concert. If you mostly play solos in church services or group concerts, you may want to look into it.
Other equipment:
You’ll need a floor music stand of adjustable height, like a Manhasset stand. Manhasset now makes a travel stand, which would be useful. I set mine as close to eye level as possible, placed slightly to one side of the bell tree stand, so it’s easier to look back and forth from the music to the bells. I always memorize my music for performance, but the music stand is helpful while learning a piece. You can also rig up a clip to hold music at the top, or tape it to the side, of the pole.
I’ll write another time about handheld bell trees. However, I’ll mention here that if you often play bell trees in procession, you may find it tiring to support the weight of the bells. You can buy a staff from Peery that looks like a shepherd’s crook, which rests on your hip using an optional pouch. The setup is a bit like a glockenspiel. The staff transfers the weight of the bells from your arm to your core, which is stronger. Then your arm merely holds the whole setup in the proper position.
I wear gloves when solo ringing but prefer to mallet trees without them to improve accuracy. When I play ‘Symphonia on Hyfrydol,’ I wear unlined Isotoner gloves that slip off quickly between the table and tree parts of the piece. I also wear gloves when setting up bell trees to protect the bells. I wrote more about gloves in an earlier article.
I have a lot to say about mallets, so I’ll write a separate article. The other key equipment (which you can read about elsewhere on this site) is hearing protection. When you work with bell trees, sound accumulates right at ear level. Protecting your hearing is critical. Think about your performing partners as well, and avoid setting up your bell trees where they could damage someone else’s hearing. When rehearsing at my house with bright mallets, I give my accompanist headphones to wear to muffle the sound.
Resources:
Clear Cut Plastics – 206-545-9131
Jeffers Handbell Supply – handbellworld.com
Sterilite 34 qt box (25”x15”x6”) – available at Target
Copyright © 2012, Nancy Kirkner, handbells.com