Bell trees were discovered by Louise Frier in the 1980s. As she tells the story, she was working with mallets and also noticed handbell musicians carrying bells from their cases to the bell table by “treeing them up” (looping the handles through others to create a strand, like crocheting, or braiding a sailboat line). In one of those Aha! moments that herald innovation, she put the two ideas together and began malleting bells in trees. Over time, repertoire developed, not only bell tree parts in choir pieces, but works entirely for bell tree soloists.
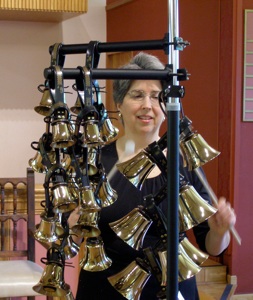
At first, musicians would string bell trees in the key required, subbing out sharps or flats for naturals. However, it was time-consuming to restring bells when playing multiple pieces in one session. Barbara Brocker developed a standardized system of bell trees, like a keyboard. This allows the soloist not only to play pieces in different keys without resetting the bells, but also to develop an intuitive sense of each bell’s position in the instrument. Barb worked with a manufacturer to build a stand for holding the bells, and clips to separate them, which you can see in the photo above, and she publishes solo bell tree repertoire. A note about terminology: the strings of bells are the “trees” (I also refer to them as strands) and the stand is “a bell tree stand” (consisting of a base, pole, and arms). I once tried to order “a bell tree,” and the vendor gently but firmly corrected me.
The biggest advantage of bell trees is that you can play them in situations where using tables isn’t practical. They take up less space, are faster to transport and set up, and can be wheeled on and off stage as needed. Bell trees add variety to music in worship or in concert, especially for up-tempo pieces hard to play from the table. The disadvantage is that repertoire is extremely limited, and likely to remain so because of the inherent limitations of the instrument. The biggest problem is that bell trees are hard to damp. Pieces played LV (laissez vibrer, or Let vibrate) work best. It can also be hard to see bells below C6 when the strands are lined up away from the ringer, and played by wrapping the arms around them like a harp (Barb’s method). You sometimes see setups using a bell tree stand rotated 90 degrees with strands of bells hanging from hooks, lined up in a row in front of the ringer. Sometimes this requires 2 stands to hold all the bells.
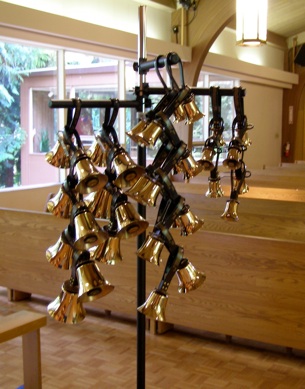 I’ve modified the standard setup to resolve some of these issues. Instead of putting bells behind the pole, and having to reach around multiple strands (while trying to see bells blocked by other bells), I put all the bells in front of the pole (from my perspective). I walk around to reach the bells instead of standing in one spot. After all, the bell tree stand is a three-dimensional object, so why limit yourself to standing behind it? This has the advantage that every bell is either right in front of me or behind (at most) one other bell. I don’t need hooks, and use the handle loops themselves to hang strands from the arms. My setup (which uses 3 arms instead of the usual 2) looks like this (from my perspective).
Although not obvious from the photo above, the side arms are angled in as far as possible to bring the bells closer together without touching castings. (You can see the angle of the arms in the picture below.) I also allow enough space to reach the inner strand of bells with the mallet without catching another bell. Note also the handle spacing on the arms, which I’ll discuss more below.
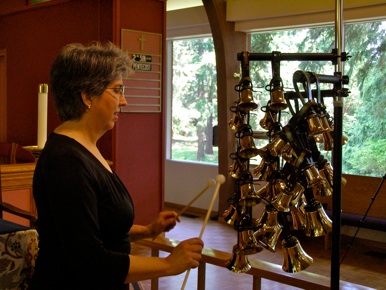
Another innovation is to adjust the height of the strands so every casting is at or below eye level. This makes the stroke more accurate and the instrument less tiring to play. (As my percussion teacher pointed out, it’s good to see what you’re trying to hit. Placing the bells so high you must reach up to strike them, as most soloists do, fatigues the arm muscles. It also makes it harder to use your knees to implement dynamics.) The lowest arm is on the left, next lowest on the right, and highest in the center. The logic behind this is to place the heaviest bells where they’re less likely to destabilize the stand; they’re also closer to the pole for this reason, as well as directly over one of the supporting legs of the base. The rest of the strands are placed as close to the outer edge of the arm as possible, for easy access.
To add bells below C5 (which I’ve seldom needed), use a fourth arm opposite the center arm. The weight of the heaviest bells will offset the weight of the bells already on the stand and add stability, instead of tipping the stand over. Placing the heavy bells on their own arm (instead of hanging them at the bottom of the main strands) prevents them from stretching out the handles of the smaller bells. If I were designing my own stand, I’d want a way to put this fourth arm lower on the pole.
Speaking of heavy bells, I’ve seen soloists tree up bells with the lowest (heaviest) on top of the strand, and highest (lightest) at the bottom. If you can wrap your mind around this setup, which makes scales counter-intuitive, it would be easier on your equipment.
My final innovation is the relative position of the sharps and flats to the naturals. In other setups, the sharps and flats are in a separate strand behind the string of natural bells (if not substituting for naturals in the main strand per the key signature). They’re in chromatic order, except D#/Eb is swapped with F#/Gb to place Eb on the same side as E and F# on the same side as F. Though on the same side, several of the bells aren’t directly behind the corresponding bell. To correct this, I placed the bells in the central strand in this order, from top to bottom:
C#7 (behind C7)
A#/Bb6 (behind B6)
G#/Ab6 (behind A6)
C#/Db6 (spacer only – it ends up behind G6)
F#/Gb6 (behind F6)
D#/Eb6 (behind E6)
Using this setup, all the bells in the keys of G, F, Bb, and Eb are directly behind the corresponding natural bells, instead of only on the same side, making it easier to play a scale in these keys. Other keys can also be played, but are more difficult, because the bells aren’t in the optimum position (except for C major, which is the easiest scale of all in this setup). Because all the bells are there, somewhere, you can also play accidentals.
In the octave below, the strand is:
(C is missing because it’s at the bottom of the next higher strand)
A#/Bb5 (behind B5)
G#/Ab5 (behind A5)
C#/Db5 (spacer only – it ends up behind G5)
F#/Gb5 (behind F5)
D#/Eb5 (behind E5)
In the half octave above the central strand, the setup is:
A7 (as a spacer – it ends up behind G7)
F#/Gb7 (behind F7)
D#/Eb7 (behind E7)
I happen to own A7 because I bought it to play ‘Meditation from Thais.’ If you don’t have A7, which is beyond the range of many solo sets, you can use any duplicate bell (the smaller the better) as a spacer.
Here it is as a table:
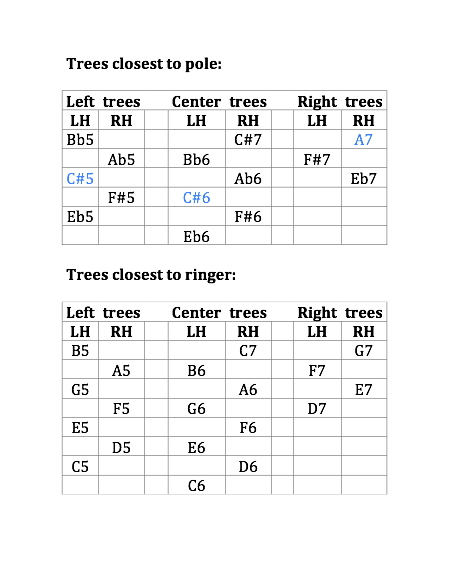
Bells in blue are for spacing. All directions are from the soloist’s perspective. LH and RH are left hand and right hand: the direction the bell casting “points” at the clapper end, and the default hand for malleting. Note that this requires a double strike when moving from B5 to C6 (both C6 and D6 will be played with the right hand). My rationale is that, if B5 were pointing right, it would be hard to play it with the right hand and then reach across to hit C6 with the left. If I were starting from scratch, I might place C6 on the right, D6 on the left, and so on up the strand. However, the C6-C7 setup is firmly engrained in my mind from other pieces learned before I developed this setup. The setup shown here also makes best use of space for Schulmerich bells. The castings of one strand mesh well with its neighbors; if anything were to touch, it’s usually a casting to a plastic handle, instead of metal against metal.
If you’ve never played bell trees before, you might consider turning around the center and right-hand trees to allow you to alternate hands all the way up the scale. (That is, C6 right hand, D6 left hand, and so on. Be sure to switch the trees of sharps and flats to match.) Another option would be to place the lower bells (left trees) on the right hand side (where the right trees are) and vice versa. Though counter-intuitive, it places the lower bells used more often at the side of your dominant hand. However, you may prefer to use your dominant hand to approach the small bells, which are a smaller target and harder to hit.
As you can see, there’s plenty of room to experiment with the bell placement that works best for you given the bells you have available and your personal strengths and weaknesses. The main point to bear in mind is that you do want to arrive at a standardized setup, so you can practice scales, arpeggios, and other skills before learning a lot of music. Once you’ve learned music and developed muscle memory with a particular setup, it can be hard to relearn it. Factor in potential expansion of the range as you optimize your setup.
In future articles, I’ll write about equipment, skills, practice tips, and composing/arranging for bell trees.
Resource:
Barbara Brocker, A Bell Tree “Keyboard” Manual, Tree-O Publishing 117
Copyright © 2012 Nancy Kirkner, handbells.com