This article assumes you understand the basics of Shelley ringing and four-in-hand “ring and knock.” Sometimes you have the bells in a pair set for the right hand, and the next time you approach that pair, your left hand is free. Rather than choreograph around the problem, learn how to pick up the pair with the other hand. There are several ways to do this, in addition to the method already covered in Interlocked four-in-hand.
Shelley – Reversing bells set up for Shelley is easy, and is perhaps the most useful reverse grip for a bell choir ringer. A little trick advanced ringers use to find bells quickly on a crowded bell choir table is to set down bells already paired. When bells are set for Shelley in octaves with the larger bell in the primary position (for example, F6 over F7), F6 is likely to ring more often than F7. You have the option to pick up only F6 and ring it, or to ring both F6 and F7 together (or to pick up both bells and ring only F7, which occurs less commonly in most bell choir music).
I once watched a fellow ringer struggle with a sequence that looked something like this:
Right hand: Eb6//Eb7
Left hand: F7\\F6
Right hand: E6//E7
Left hand: F#7\\F#6
Right hand: F6//F7 – except it was already set up for the left hand (see the second line)
If you need to ring the pair with the other hand, you might turn the primary bell over. However, when your hands are full of bells and moving at a fast tempo, it’s hard to pick up the primary bell and turn it around on the fly. If you give the pair a quarter turn outward as you set it down, it’s easy to pick it up with the other hand. That is:
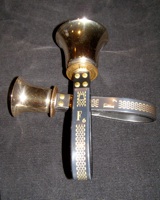
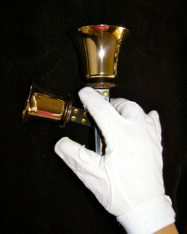
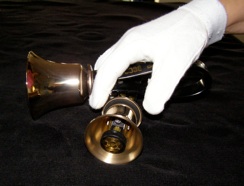
• Turn the pair clockwise if starting in the right hand (counterclockwise if starting in the left hand). You may need to step to one side (or shift your weight). The picture below shows a Shelley pair set for the left hand, after turning.
• Place the index finger of the other hand between the castings as usual.
• Press the thumb against the handle block of the secondary bell (closest to the table).
• Tuck the other fingers inside the handle of the secondary bell.
These pictures show my hand about to pick up the pair, so you can see the fingers as they move into position, and a view from the side:
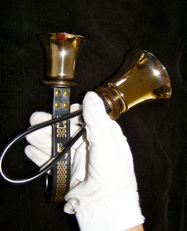
• Pick up the pair with the castings pointing up in an X shape in front of you.
• Ring with the usual stroke.
It will feel a little strange, but you should have no difficulty picking up the pair and getting the bells to ring. There’s no standard notation for this, but I draw a little curved arrow to remind myself to rotate the pair.
 for lh and
  for rh
You can do this technique with chimes also. You may need to wrap something around the chimes to keep them from clanging as they rub together. I use medical tape, the kind that sticks to itself but not to anything else. You can buy it at the drugstore.
You may find it easier to Shelley ring small chimes if you hold them parallel with your index finger between them, instead of one chime on top of the other. In that case, you would just set the pair down next to each other and pick them up with the other hand, with no special technique.
Ring and knock – This is a little trickier. There are two ways to do it. Here’s the method I prefer:
• Set up two small bells for your left hand in “ring and knock” configuration.
• Leave them on the table in the usual position.
• Step slightly to the left.
• With your right hand, put your fingers through the handle loop of the secondary bell.
• Put your thumb over the handle block of the primary bell, into the space between the castings.
• You can experiment with the exact hand position that works best for you. You may prefer to place one or more fingers outside the handle of the secondary bell. Again, this picture shows my hand moving into place, so you can see the fingers.
• Pick up the pair with the handles vertical and the secondary bell casting straight up.
• Ring the secondary bell toward 12:00.
To ring the primary bell:
• Set up the pair for the left hand.
• Pick it up in your right as described above.
• Turn the secondary bell nearly horizontal and the primary bell casting toward 10:00.
• Ring toward 10:00.
• For the left hand (holding a right-hand setup), ring toward 2:00.
Another way to ring the “ring and knock” setup in reverse:
• Place your index finger between the castings.
• Put your middle finger around the handle block of the primary bell (which is turned sideways).
• Put your thumb around the secondary bell.
• Pick up the pair and ring the secondary bell as you did before.
• Ring the primary bell across your body, with a wrist motion like turning a doorknob.
• You can ring it outward instead, if you don’t mind looking like you’re swatting flies (or the ringer next to you).
You would use this technique with chimes.
There’s no specific notation for either of these methods to ring “ring and knock” with the reverse grip. You just use standard notation for the pair. Sometimes I write lh or rh next to it to remind myself that I’m going to ring it with the left hand or right hand. As you set the bells down, you can keep them paired or return the primary bell to its home position. Again, you would use standard notation to indicate your choice.
If you find bells hard to ring, you may need to ease the spring tension. I keep the tension on my bells very loose, but with the springs tighter on one side, which is common. Check that you’re holding the bell right side up, and that the clapper is starting on the side opposite the strikepoint. You can start low and add lift to your stroke to improve the likelihood the bell will ring.
Once you master this technique, you’ll be able to ring a pair that’s already set up without having to reset it or free up a hand, which will give you more flexibility in choreographing complex solos.
Note: Special thanks to David Allen, as I learned a great deal about this topic from his book ‘Advanced Solo Ringing: Multiple Bell Techniques.’
Copyright © 2012 Nancy Kirkner, handbells.com