Holding three bells in each hand (called six-in-hand or 6IH) can solve certain ringing problems. For example, you may need to play an ostinato (repeating pattern) with more bells than you can comfortably play with four-in-hand, even traveling. Become proficient in four-in-hand before attempting six-in-hand. Having that experience will help you master the setup with an additional bell in hand, and you’ll find more uses for four-in-hand, anyway. It can take several months to master six-in-hand, though I hope the suggestions below, as well as the video tutorial, will shorten your learning curve.
There are several different ways to hold three bells in each hand. One of the most popular is by interlocking the handles. The advantage is that it’s faster to pick up the setup and easier to hold, since larger muscles support the weight of the bells. The clappers stay in the same position relative to one another; there’s less opportunity for them to slip and twist than if the handles are unlocked.
The disadvantage is that one of the following must apply:
• The bells you plan to interlock appear only in the six-in-hand passage, not the rest of the piece.
• You have duplicate bells in the six-in-hand range.
• You have time to organize and interlock the bells during the piece and, if necessary, break them apart again.
Because of these drawbacks, I prefer six-in-hand “clusters,” which I’ll write about another time. That method not only allows me to set and break apart groupings on the fly, it also supports a more elegant ringing stroke. However, I’ll start with the method you’re most likely to see others use. This is presented both as video and explanatory text below. (At the time I made the video, this website had a different name.)
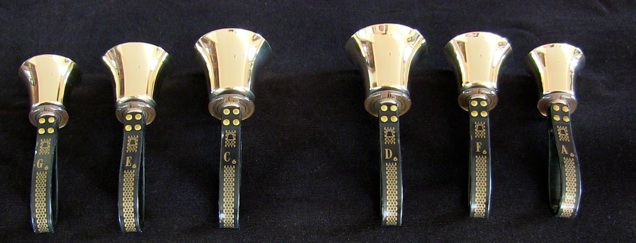
Range of bells: For learning this technique, bells in the “6” range work well. Though you can six-in-hand with any size bell (some people can even do it with bass bells!), the 6 range tends to be light enough for most people to manage. Bells in the 5 range are too heavy for a beginner. Clappers in the 7 range can be more difficult to control, and the piercing sound is hard on your ears. However, since they’re lighter in weight, you may prefer to work with the range C7-G7 instead of C6-G6 as shown below. When you play a piece, you’ll obviously use bells in the range required.
You can use various setup orders, but I prefer to set up in thirds, with the largest bell in the primary position at the thumb. This gives you the best control over ringing and damping. If ringing stepwise, you would alternate hands, which allows time to rotate the next bell into position. Putting the lowest bell of the range in the left hand is intuitive, if you’re used to a keyboard layout. It can be hard to damp individual bells (more on that later), but you can easily damp the entire setup in one hand. Therefore, it’s logical to put all the notes of the same chord in the same hand, which setting up in thirds facilitates. Putting the lowest bell of each triad in primary position gives you the most control over the heaviest bell.
Example:
Bell range: C6, D6, E6, F6, G6, A6
Left hand: C6, E6, G6 (C major triad)
Right hand: D6, F6, A6 (D minor triad)
Setting up the bells: In the right hand, the lowest bell (of the 3) is already first (in keyboard order), which will place it where we want it, in the primary position at the thumb.
However, we need to reorganize the left hand bells by switching the inner and outer bells.
Left hand: Switch C6, E6, G6 to G6, E6, C6.
Here’s our starting setup order:
I’ll call C6 and D6 the inner bells, E6 and F6 the middle bells, and G6 and A6 the outer bells.
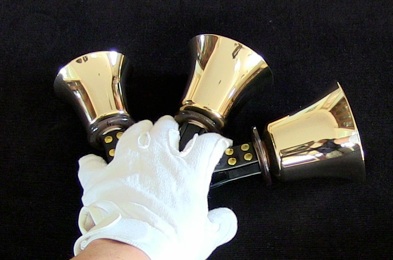
Interlocking: The two outer clappers in each hand will end up parallel, so put the “ring side” facing the same way on both bells. (The “ring side” is the bell symbol on the handle. Ringing with the handle facing the wrong way is harder, if the springs are set with unequal tension.)
Insert the outer bell into the inner bell, starting at the outer edge of the inner bell. Turn the handle of the inner bell just long enough to slide it through, before turning it back into parallel.
Example: Right hand – Inner bell is D6, outer bell is A6. Turn the A6 handle so you can insert it into the D6 handle from the outside (that is, from right to left).
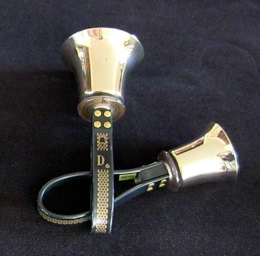
The next picture will illustrate the result of the following steps:
Turn the A6 handle back so the ring side of both handles faces up, when the pair lies flat on the table.
The left hand is a mirror image. Insert the outer G6 bell into the inner C6 bell, from the outside (from left to right). Turn G6 so the ring sides of both G6 and C6 face up, just as you did with A6.
Turn the middle bell handles a quarter turn so the ring sides face inward. That is, the left hand middle bell (E6) will face to your right, and the right hand middle bell (F6) will face to your left.
Insert each middle bell handle into its corresponding pair. Don’t turn the middle bell’s handle back; it remains turned sideways. The fit may be a little tight, but it will work with some persuasion. The picture below shows the handles interlocked.
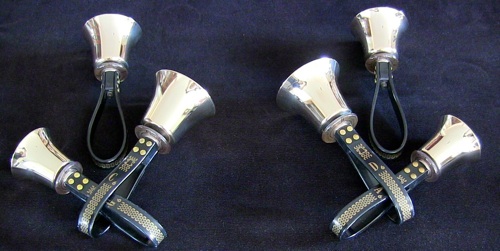
Pick up the bells with your thumb around the inner bell handle, index finger between the inner and middle bell, 3rd and 4th finger between the middle and outer bell, and pinky outside the outer bell.
Lock your pinky around the handle block and hook it just inside the handle of the outer bell. This helps lock the handles and prevents slipping. The handle assembly rests against the palm.
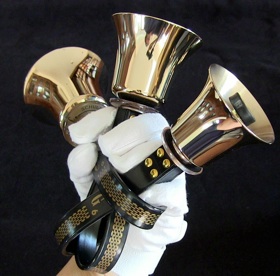
The two pictures above show the left hand, so my right hand could work the camera, and your right hand can scroll on your computer. The right hand is a mirror image. If it’s your dominant hand, you might prefer to learn the ringing stroke with it first, before attempting the left hand.
Ringing stroke (right hand): Since both the inner and outer bell have the clappers facing the same direction, they will ring together with a normal Shelley stroke. Try this before ringing them separately.
To ring the inner bell (D6, closest to the thumb), turn your hand so the back of it faces slightly outward (to your right). Imagine you’re facing a clock on the wall, and ring toward 10:00. You may feel like you’re leading with the tip of your thumb.
To ring the middle bell (F6), turn your hand so the middle casting points straight up. The back of your forearm will face right. Ring with the normal stroke: down and then out (in a circle) aiming straight ahead. This may feel strange, because the bell is in the usual ringing position, but your hand isn’t.
To ring the outer bell (A6), turn the back of your hand so it faces up and angled toward your chest. Ring the bell as though toward 10:00. It’s sometimes described as a throwing motion, but try to minimize that as you improve control.
The left hand is the mirror image. Envision ringing the inner bell toward 2:00, as well as the outer bell (with a different hand position). With either hand, as you gain experience, you can ring more in the direction of 12:00, and less toward 2:00 (left hand) or 10:00 (right hand).
Practice tips: Mastering the six-in-hand ringing strokes takes a lot of practice. Always work on six-in-hand in very short sessions, no more than 10-15 minutes at a time. Plan to practice many days in a row, even several times within a day, instead of a marathon session. (Borrow bells to take home if necessary.) Within your short practice session, set down the bells and rest your hands often.
It takes time to build up calluses in all the right places. While learning, you may want to wear pieces of moleskin where the bells tend to rub, especially the ring finger, outside the middle knuckle. Medical tape, the kind that sticks to itself but not to anything else, is also good for this; wrap it in a band around your finger. I like to wear gloves with dots, even though I usually prefer gloves without dots. The dots keep the bells from slipping and rubbing your fingers. You can also try double-gloving, perhaps wearing gloves without dots inside gloves with dots, though the bulky result may feel awkward.
Problem solving: These tips may help you not only with six-in-hand, but with other ringing problems.
• Make sure the clapper is angled back so it travels the full width of the bell. “Air bells” come from the clapper falling forward into the side of the bell, with no momentum.
• A good cure for many clapper problems is to ring lower and add lift to the move.
• If the clapper won’t engage, the spring tension may be too tight. Try loosening it, if the bells belong to you, or ask permission to adjust borrowed bells.
• Check that the handle “ring side” is facing you at the start of the ringing stroke. Many bells have the spring tension adjusted unevenly, so it’s harder to ring the bell if it’s backwards.
• Ring in front of your body, using the muscles of your shoulder, back, and arm, not with your arm out to the side, where you have less strength.
• Stand with one foot slightly in front, and lean into the stroke to put more power behind it.
• Flexing the wrist during the stroke can engage the wrong clappers. Keep your wrist solid, with no twisting motion. Before you begin a stroke, rotate your whole forearm from the elbow, instead of twisting the hand and wrist. Try this by putting the bells down and pretending to turn a doorknob.
• Hold the handles in a relaxed grip. The handles lock the bells together; you just have to hold the setup in the air. Support the weight over the stronger muscles of your forearm, not with your hand and fingers.
• Often the dominant hand (usually the right) is easier to master than the non-dominant hand. Take your bells to a mirror. Look at how you’re holding and moving the bells, especially the clapper position and angle of your hands. Match the awkward hand to the capable hand.
One special difficulty is mastering the motion of one handle pivoting around another. Try removing the middle bell and practicing alternate Shelley without it. It may help to cup the casting of the inner bell loosely with your other hand as you learn this technique. You want the inner bell to rotate on the axis of its handle, not move in any other direction. Once you “get” this, release the inner bell and try to maintain the same motion of the bells in relation to each other.
Damping: You can damp the whole setup, or the inner and outer bells alone, at the ribs, table, or belly. That’s one advantage of setting up in thirds: you can damp out the whole chord when the harmony changes. When working with pentatonic scales, you may not need to damp at all.
You can also finger damp, but will need to switch to gloves without dots after learning the ringing strokes. (You want your finger to glide across the casting, not stick to it. Once you build up calluses in the right places, you won’t need dotted gloves as much, anyway.) With undotted gloves, you can damp the inner bell with your thumb and the middle bell with your index finger. Experiment with various damping options (including table and shoulder) to see which works best for each bell.
Other options: You can ring more than one of the bells in each hand at a time. Experiment with various clapper angles to engage two or even all three bells in one hand. I’ll demonstrate this in the video.
You may see someone ringing the outer bell by swinging away from herself. Personally, I find this difficult, because you have less hand strength behind the bell. If you want to try it, take the setup apart. Rotate outer bell’s handle so the “ring side” faces opposite the inner bell, then reassemble the setup. Hold the right-hand setup against your left shoulder with the inner casting pointing up. Leading with the outer casting, swing your arm in an arc out toward the right, and slightly down. It reminds me of a backhand stroke in tennis.
You can play six-in-hand solos without tables. If you have somewhere to set down bells, you can add another six-in-hand setup, or a pair, or even just a single bell, and change out bells as needed for the piece.
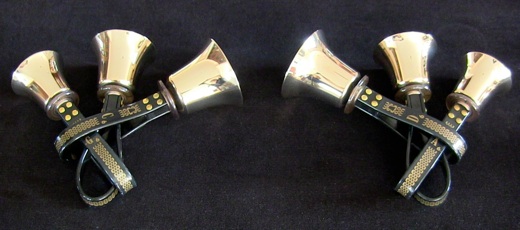
Notation: The Guild has official notation, but I created this, which I find more intuitive (bells correspond to the completed setups pictured above; L and R designate left hand and right hand):
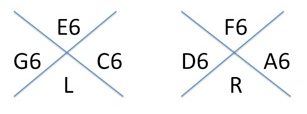
Copyright © 2013 Nancy Kirkner, handbells.com