In this article, I’m assuming you’re comfortable with the standard “ring and knock” method of four-in-hand. I may come back to four-in-hand fundamentals another time. Today, I’m going to focus on four-in-hand setup choices and one method of changing the setup in the air, called Shelley plus and minus. This could also be used for pairs of bells not in Shelley position, like “ring and knock.”
Remember that the primary bell is the first bell you pick up, the one held by your thumb and index finger. You may think of this as the bell you “ring” in “ring and knock.” The secondary bell is the second bell you pick up, between your index and middle fingers, or the “knock” bell. If you’re not familiar with four-in-hand notation, buy a handbell notation guide.
Setup choices: Generally, we choose four-in-hand pairs to ring with alternating hands, which results in a more legato line. We may set up the bells in thirds, which facilitates combo ring. We also put pairs in alternating hands for a rolled chord. However, sometimes the general flow of a line requires holding sequential bells in the same hand. Here’s an example:

You may remember this Nimrod passage from the blog post for composers. I solved this by pairing Bb5 with G5, ringing them both in the left hand.
In this case, I chose to let G5 ring, not damping it until beat 2, so I could keep Bb5 moving up to create the dynamics the passage calls for. The style of the piece, the fact that the bells are in the same chord, and the short duration of the overlapping notes gave me permission not to damp. If a passage must be cleanly damped, you’ll need to practice damping one bell while ringing the other in the same hand. The larger the bells, the more difficult this is. One option is to table damp one bell and use just enough force against the pad to engage the clapper of the other bell. Try not to let the motion stress your wrist or ring the bell too loudly. Another option is to finger damp the first bell immediately after you ring the second bell (which is easier and cleaner than ringing and damping simultaneously).
Sometimes you need to set up pairs for the hand opposite the one currently holding the bell. For example, you want to set Bb5 over G5 for the left hand, but you’re holding Bb5 in the right when you need to set it down. If you turn and step slightly to the side, away from the casting and pulling the handle toward you, you can set the bell down gracefully. In this example, I’d step to my left as I set up Bb5 over G5 for the right hand.
You would put sequential bells in the same hand when there’s an extremely short note value. Trying to change bells during a 16th note is difficult, and may result in a bell moving down when the music wants it to move up, either for dynamics or for best visual effect. Here’s an example from Faure’s Pavane:

In measure 1 above, I’d put F#6 and G#6 in the same hand, and A6 and B6 in the other hand, to accommodate the 16th notes. In measure 2, table B6 during the long G#6. The 16th note there isn’t a problem, because you don’t need to pick up any bells until measure 3, when you have plenty of time to change between A6 and E6. Try this with the following pairs:
G#6\F#6
A6/B6
E#6 (which is the F6 bell)/C#6
These pairings allow the bells to rise during the soaring long notes, matching the visual to the auditory experience.
You may also want to put sequential bells in the same hand when you need to buy time before ringing with the other hand, such as moving along the table or doing a complex setup.
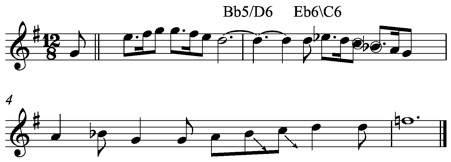
This measure from Meditation from Thais would be a good place to put F#5 (sharp from the key signature, not shown) and A5 in the same hand, with D6 and F#6 in the other hand, buying time to move to A6 and B6, which would also be paired. Unfortunately, I didn’t realize this until this piece was already in performance, so I used alternating hands with suboptimal results. I plan to correct that the next time I program the piece.
Another good reason to pair sequential bells is to do a trill. It’s much easier to trill bells evenly if they’re in the same hand. Hold the pair in the Shelley position with the primary bell pointing up and slightly away from you, and the secondary bell pointing away from you and slightly down. Your thumb will be on top and pointing across your body. Then rotate your arm from the elbow, like you’re jiggling a doorknob.
Generally, you want the larger, heavier bell in the primary position, to provide more control. Sometimes the pattern of notes requires that the smaller be primary. Over time, you’ll learn to control increasingly larger bells in the secondary position, regardless of the size of the primary bell.
If you have trouble remembering which bell is which, pay attention to the relative weight of the bells. The heaviest is lowest, the lightest is highest. Learn and use four-in-hand notation; just writing down the setups will help you remember them. I also found it helps to have only 3 bells total in your hands at first, because that’s easier to remember, and then work up to 4 (or more). It’s also easier to remember a pattern that alternates ringing and knocking, instead of ring-knock-knock-ring, or knock-ring-ring-knock. However, sometimes that sequence can’t be avoided.
Shelley plus and minus: Shelley plus or minus is a form of passing to or from a multiple bell setup. Normally, you table a bell with the same hand that rang it. In Shelley plus, you hand yourself a bell when the receiving hand already holds a bell. In Shelley minus, you take a bell away from a pair with the opposite hand.
To learn all the Shelley plus and minus variations, work at first with only two small bells. The easiest form of Shelley plus and minus moves a bell into or out of the secondary position (the one that’s held by your index and middle fingers). You might also think of it as the bell that “knocks.” A good example of when you might use Shelley plus and minus with the secondary position is when you’re setting up to ring a chord (or coming out of it).
Once you’ve mastered this, try pulling a bell out of the primary position with the opposite hand. The trick is to hold the secondary bell between the knuckles of the index and middle fingers, let the primary bell balance loosely between the thumb and first finger, grab the bell with the other hand, and drop your thumb to release the handle. You can grab the bell casting with your whole hand at first to understand the motion of the “sending” hand. Then refine the motion of the “receiving” hand by using your thumb and index finger to pull it out into primary position, or use your index and middle finger to pull it out into secondary position.
Shelley plus to the primary position is just the opposite motion. To practice, pull the primary bell out as before, and then put it back. This is the hardest of all the Shelley plus/minus techniques and poses the greatest risk of clashing bells. Insert the bell only until you have a partial grip on it, not all the way in, then ease it in with gravity and the fingers of the receiving hand.
Here are examples of Shelley plus and minus with the primary position.
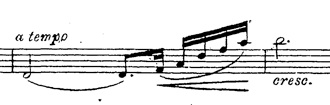
Example 1: from Faure’s Aurore, Shelley minus from the primary position (“pullout”):
During the 2/4 measure, my right hand pulls D6 from the left hand, then picks up F6. This positions me for measure 5 (notation omitted). You can see this on my video at Youtube.com/solohandbell.
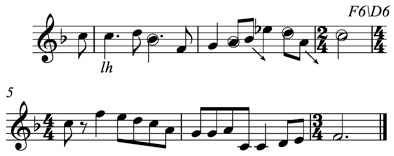
Example 2: from Gesu Bambino, Shelley plus to the primary position:
Inserting Bb5 into the primary position of the left hand, which is already holding D6, sets up the bells for the traveling sequence in the next measure, with Bb5 constant in the left hand and C6 constant in the right. Doing the setup as a Shelley plus allows D6 to sound for its full value, and creates visual interest during the long note. I set up the other pair, Eb6\C6, as I pick it up.
You can use Shelley plus and minus not only for ringing, but for damping. You can pass a bell to the opposite hand when you need to place it on the table on the opposite side from where you rang it. For example, you rang it in your left hand, but want to replace it on the table to your far right. This technique also works with “ring-and-knock” (clappers perpendicular instead of parallel).
The advantage of Shelley plus and minus is that you can regroup pairs of bells in the air. That allows you to hold a long note up, instead of reaching down toward the table to pick up the next bell. The disadvantage is that you must have a hand free to place or accept the bell being moved. Although it’s possible to do this with two bells in each hand, you’re likely to clash bells. You also end up with both hands high, maybe even in front of your face. That isn’t the most attractive posture and could distract the audience if it happens a lot. It takes more time to pick up a bell and hand it to yourself than traveling four-in-hand, so you’ll use Shelley plus and minus mostly when you find yourself holding a bell in one hand and need it in the other. Once you become skilled in traveling four-in-hand, both the technique and choreography, you’ll probably use that more than Shelley plus and minus. However, it’s useful to have multiple approaches available to create ideal pairings. As the saying goes, if the only tool you have in your toolbox is a hammer, you tend to view every problem as a nail.
Copyright © 2011 Nancy Kirkner, handbells.com