Over the next several weeks, I’ll talk about how I approach choreographing a piece. I’ll include the pros and cons of each approach, as well as when and how I’d use each. Throughout this discussion, I assume you’re ringing bells placed horizontally on the padded table. Some soloists place the bell handles upright, and they may use different methods to organize them.
I define choreography as the organization of bells on the table and the movements chosen to ring them. In particular, the soloist chooses where to place bells on the table both before and after ringing, which hand to use for each bell, which multiple bell techniques to employ, which bells to pair in four-in-hand setups, and which bells to keep in hand (constants) during traveling four-in-hand. She designs an approach that (once worked out) will be used in every practice, rehearsal, and performance of a piece. For the highest level of artistry, seek methods that result in the best musicality (ringing and damping each bell on time, at tempo, with expression and good sound quality) while looking graceful. Experiment with multiple approaches, and expect to improve with experience.
Some people call choreography “blocking.” I find that audience members instantly understand the term choreography, when they ask me about solo handbell methods after a concert. It’s a familiar term from the dance world (and solo handbell performance is often likened to a dance), while blocking is more of a technical theater term.
Basic principles of choreography:
• Favor the simple over the complicated.
• Keep bells in keyboard order where possible. Move bells from their home position only for a good reason, and return them as soon as possible.
• Position your body to minimize reaching, and avoid crossing arms.
• Start each phrase with the hand that simplifies the choreography for that phrase.
• Displace or return a bell, or create or break apart pairs, when picking up or tabling a bell in the course of ringing, not as a separate motion.
• When holding a long note, keep the bell moving up, not down.
• Minimize passing bells between hands. When absolutely necessary to pass, do so on a long or repeated note.
• Choreograph a reoccurring passage the same way each time, including a passage that’s identical except for a different octave or key signature.
• Look for opportunities to solve multiple problems with a single change in approach.
Beginning choreographers (especially those coming from an advanced bell choir) are often tempted to add individual duplicate bells to solve a choreography problem. I advise avoiding duplicate bells: you have to buy them, store them, haul them, polish them, and keep track of them on the solo table. Duplicate bells have limited resale value unless part of a coherent set. Instead, master more multiple bell techniques (such as alternate Shelley and reverse grips) to increase your choreography options. Know (and over time, stretch) your size limits for four-in-hand bells.
These are not strict rules. For example, sometimes duplicate bells are the best option. In general, though, following these principles will facilitate learning and performing pieces as part of a larger repertoire.
The keyboard layout: Recall that the starting point for solo ringing is like the piano keyboard, with the naturals in a single row closest to the ringer, and the sharps and flats in the second row. On a 30 inch wide table, there’s room for a third (empty) row, which will be discussed later. On a 9 foot long table (3×3 foot tables), I place B4 to G7 in the first row and C#5 to F#7 in the second row, near their related natural notes. Here’s part of the setup:

Notice that I align the handles of the second row clear of the castings of the first row. That allows me to put the bells close together while still leaving room to pick them up without hitting adjacent bells. I also place the handles of the closest row (the naturals) at the edge of the table.
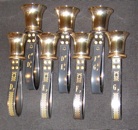 Sometimes, I’ll park the high treble bells in the upper right corner, clustered as shown here. I might move these unused bells to the corner when I have a long leap from the bass to the high treble, so I can use the top bell in the “bells used” range as a landmark. You might use this principle to park bells from G#7-C8, if you have them, or to compensate if you have less table space (like an 8 foot table), or if you space your bells further apart than I do. You can place the unused bells either straight on, or turned so the handles face inward at a 45 degree angle (to use the corner efficiently). The high treble bells take less space when arranged like this, and you can quickly find what you need when you reset the table, or if you forgot a bell during setup. (Note that I put the sharps and flats in the second row, even though that puts the bells out of order, because it’s more intuitive to find them quickly.)
Displacement: We speak of each bell’s position in the keyboard as its home position, and a bell not in its home position is displaced. Some soloists develop a very strong keyboard orientation and get positively antsy when bells are displaced. The advantage of keeping bells home is that you always know where to find them, it’s easier to learn and choreograph a piece, and you minimize setup time between pieces. If you don’t remove unused bells, you can use them as markers to table other bells. For example, you know that the G6 goes below F#6 and G#6, which helps when you’re holding several adjacent bells while staring at a vast expanse of interstellar corduroy wondering where to table that single bell.
The disadvantage of strict keyboard order is that you end up weaving a lot, making it hard to attain a legato line, full musical expression, and beautiful visual effect. If you listen to soloists who seldom move bells out of keyboard order, you’ll hear choppy damping and/or pieces not played at tempo, and, if you watch them, you’ll see their movements are much less graceful when they’re working in a confined space. Sometimes bells that aren’t used get in the way, and the space they occupy could be put to better use. When there’s a big jump in the music, it’s easier to get to the bell on time if it’s close to where you’re already ringing.
I generally start with the keyboard setup, and I don’t automatically remove unused bells. However, if I find myself colliding with an unused bell while picking up four-in-hand pairs, or if I covet its space for displacements, then I’ll remove it from the table. This is especially true at the bottom of the keyboard. I treat every bell below C5 as expendable. I consider the space assigned to the Bb4, B4, C#5, and D#5 available for any bells in the range of C4-D#5 that the piece requires. The notation for removing a bell is the pitch (e.g. C#5) with a slash through it. This is also how you indicate the space normally occupied by that bell.
The initial table setup will reveal itself over time, as you choreograph the piece. When you realize a bell is in the way, see what happens if you remove it. Notice if a bell is used only once in the piece, and if it would simplify matters to move it closer to where it’s played when it does occur. That would be a good candidate for a preset, defined as a displacement that happens during setup rather than during the piece. You might also preset a bell if the first time you use it will result in an awkward reach. You can put it closer to where you need it, then either leave it there or send it home, depending on what happens later.
You can also move a bell within the keyboard to make it easier to reach with the opposite hand. I nearly always place the lowest bell in the “bells used” range where I can reach it with my right hand. For example, if D5 is the lowest bell, I’ll place it in the space above E5 and F5. Obviously I wouldn’t do that if it turns out I want to pick up D5 in the left hand anyway. Although I might displace the top bell in the high treble, it’s less useful there; the bells are closer together and easier to lift. If I need to displace bells to accommodate a jump in the music, I’ll move treble bells down to the bass, instead of bringing bass bells up. It’s easier to carry small bells, especially with multiples (four-in-hand), and easier to find room for them on the table.
When you displace a bell, you have several things to think about. First, consider whether displacement is the best solution. The more techniques you know, like traveling four-in-hand, the more options you have. If you do want to displace the bell, where are you going to put it? The spaces above E and F, or B and C (where there are gaps in the black keys on the piano) are useful for this. You want the displaced bell to jump out at you, not get mixed in with other bells. You also want to keep the castings from clanking together. I place the displaced bell slightly out of line with the other bells, a little further away from me. You can also use the blank third row for displacements, especially if you’re tall and have long arms. I tend not to use the third row as much as I’d like, because it’s harder to reach, especially for larger bells. I sometimes use it to park small bells I’ve removed from the setup for the entire piece, so I don’t forget to replace them for the next piece. (Large bells that I remove go on the “extras” table, because they get in the way on the main table.)
If you’ve displaced one bell, that makes its home space available to displace another bell. You can “share” displacement spots. As you’re picking up a bell, you can use the spot that opens up to table a bell currently in your hand (though you need a plan to open the space again for the bell that belongs there). You can also preset a bell on end in the space above another bell, then pull it horizontal when the space opens up.
Another choice in displacement is when to displace a bell. You may want to displace it during setup, or while the accompaniment is playing alone. You may want to displace it when restoring it to its home position would be awkward. If the next time you pick it up, you’re going to need it somewhere else, you may want to displace it when you table it after ringing it. As a last resort, you can displace the bell when you have time and a free hand to move it, like during a long note.
A third choice is when to restore the bell to its home position. In general, I like to get it home as soon as possible to avoid having a table full of bells out of order. The exception is when the displaced position is the most convenient place to find the bell the next time I play it. I might wait and bring it home then, or I might leave it there through the whole piece. Sometimes I swap two adjacent bells, especially in the bass. I often find that putting them in each other’s spaces facilitates both the tabling and the next use of the bells. This also works for four-in-hand pairs; you set them up, ring them, and set them down together while traveling in one direction along the table, then ring them again and dismantle them when you come back in the opposite direction.
If you can’t send a bell home in a single motion, you can nudge it a few inches in the third row over the course of several measures when you have a free hand, until finally it’s back where it belongs. Sometimes, there is no good way to have a bell where you need it at all times, and that’s when you resort to duplicate bells.
Consider using displacement to set up for the next piece in the program while ringing the current piece, so you can move on immediately. That’s easier to do if you have a standard concert program with the same order every time you perform.
Some soloists optimize every piece individually. They treat the table as a blank canvas, and place the bells they ring in the right hand on the right side, and the bells they ring in the left hand on the left side. They then arrange the pattern to make the bells as easy as possible to pick up. Some of the principles to consider are: placing bells rung sometimes in the left hand and sometimes in the right hand closer to the center, placing bells rung most often in the row closest to you, and using the outermost row for bells that individually take the most space (either because they’re low bells, or because they’re set up in interlocked multiples), reserving the more convenient space for a larger number of bells.
The advantage of this “displace everything” approach is that the music can sound very smooth. It would also be a great way for someone with limited mobility to ring while standing in one place or even while seated. The disadvantage is that it takes a long time to set up between pieces, because you have to dismantle one setup to get to an empty table, then reset. This becomes tedious for a concert audience. They came to hear music, not listen to someone speaking to cover setup time. (When was the last time you went to a handbell concert and wished there had been more talking?) The more pieces you have in your repertoire that have customized setups, the harder it is to remember where to look for a bell during performance. It may take longer to work out the optimal setup, and you may need to do more passing between hands. If you play standing in one place, it’s less interesting for the audience than approaches that use movement along the table.
It’s possible to use this approach in a slightly smaller way. I once learned a beginner piece that starts like this:
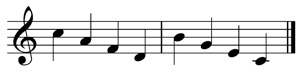
I was taught to set up the bells in this order
C5 E5 G5 B5 D5 F5 A5 C6
then play down the row from right to left. The piece ends with a C scale, played in alternating hands starting with C5 in the left and D5 in the right.
I approach a few pieces like this, in whole or part. Sometimes the rest of the table is in keyboard order. For example, it’s easier to play passages like this in Vivaldi’s Winter:

by setting up the bells like this:
A5 C6 E6 G6 B6
B5 D6 F6 A6
I stand in the middle and swivel to the left or right depending on which hand needs to start the measure.
You can also replace the naturals with the sharps and flats in the key signature. The advantage is that you minimize wrong notes, it’s easier to learn if key signatures aren’t your strong point, and sometimes it’s easier to lift heavier bells, because they’re closer to your center of gravity. The disadvantage is that you have to change the setup for every piece, you can’t change keys or use accidentals during the piece, and it’s harder to weave reaching from side to side than reaching out. I don’t recommend this approach unless you have a compelling reason.
In future weeks, I’ll talk about traveling four-in-hand and other approaches to choreography.
Copyright © 2011 Nancy Kirkner, handbells.com