Note: The term “best practices” means a methodology that consistently produces superior results.
Preparation – director: Do score study, breaking down each piece to determine how you’re going to approach teaching all the elements, such as rhythm, techniques, musical expression, etc. In the 1990s (and perhaps other years), Overtones ran an excellent series called Conductor’s Roundtable, where accomplished conductors explained how they would analyze and teach a piece. If you’re a member of the U.S. handbell guild, you may find some of the articles online, or you could order back copies. Always go into rehearsals with a plan for what you want to accomplish, and consider how that fits into the bigger picture of preparing to ring in church or present a concert.
Allocate time to specific parts of rehearsal, so you know when to move on. Example:
• 15 minutes – setup – adjust the setup starting time as needed to allow rehearsal to start on time
• 5 minutes – stretches, devotions, and/or sharing time – be strict about time limits; you have work to do!
• 10 minutes – warm up with a drill, preferably one that doesn’t require reading
• 20 minutes – work through a difficult section of piece A – more about this below
• 10 minutes – review easier parts of piece A, and play it through in its entirety
• 10-15 minutes – break – set a timer for a 2 minute warning to return to the bell table
• 15 minutes – teach a difficult rhythm in upcoming piece B, working from the abstract to the specific. I’ll write a separate article on how I teach rhythm.
• 10 minutes – introduce the melody, structure, and musical plan for piece B – for example, hand out hymnals and have everyone sing the melody, point out similar sections, answer questions about optional repeats or doubling, ask that music be marked before the next rehearsal (see separate article about marking music)
• 5 minutes – announcements – by placing them at the end, you limit the tendency for announcements to drag on; everyone will be eager to go home.
• 15 minutes – teardown, maybe snacks
You’ll notice that the above adds up to about 2 hours, with almost an hour devoted to non-productive time (setup, teardown, etc.). If you want more time with hands on bells, you need to schedule a longer session. More thoughts on time management below.
Preparation – ringers: Encourage ringers to take their music home before rehearsal, and teach them how to practice without bells. (See my article about that.) Even better, make the bell room available between rehearsals if possible. If you work on multiple pieces, email ringers your rehearsal plan at least 3 days in advance, so they can focus on preparing what you plan to cover. Rehearsal marks, designating large sections of a piece, can help you think about and communicate your plan.
Teaching the music: Ineffective directors tend to just run through pieces over and over at tempo. While it’s fun to play the easy parts, capable ringers aren’t learning much from drilling parts they could sight-read. Even worse, struggling ringers get lost at the difficult parts, and drop out. Repeat the process 10 times, and some ringers get zero rehearsal on the piece or, worse, they ingrain mistakes through repetition. Expert directors break each music selection down into smaller bites, some as small as a measure. They drill these hard bits to ingrain the correct execution, knowing that “practice makes permanent.” Remember the 80/20 rule: 80% of your problems come from 20% of the piece, so spend 80% of your time and effort there.
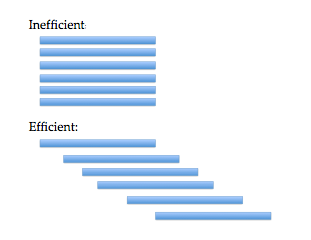
The most difficult section is often the last page. Working in sections from the back of the piece toward the front builds confidence. It also teaches ringers how to play a section in isolation from what came before, a helpful recovery skill. When you do start at the beginning, don’t return to the beginning every iteration, or you’ll devote too much time to the opening measures. Stagger the starting point, perhaps 8-10 measures further along, like this:
Start slowly and bring each section up to tempo, incorporating all the musical expression in every iteration. A mistake some directors make: rehearsing a piece without dynamics, then introducing them just before performance. Dynamics aren’t frosting on notes – they’re integral to the music, and ringers need to build muscle memory of the movement that creates the appropriate sound.
Spend some time on developing skills, perhaps introducing rhythms or new techniques in isolation a few weeks before you need them in a piece. Teach a technique to all the ringers, even if only a few need it immediately. Assume it will take some time to get comfortable with a new technique. Where possible, have ringers learn the technique with both their dominant and non-dominant hand.
Warmups are a good place to develop skills. While it’s tempting to skip the warm-up and just dive into the sheet music, your choir’s ringing will suffer in the long run. I like to do simple exercises taught without reading music, so ringers can focus on technique and quality of sound. Tell them not just to listen, but what to listen for. For example, if ringing repeated quarter notes, in thirds, along the length of the bell choir, say, “I want to hear your bells ring exactly together, and see them in motion together.”
Using time efficiently: Rehearsal time is precious; use it wisely. With other instruments, people take lessons, they learn their part in a piece, they practice on their own, then they come together to rehearse as an ensemble. In handbells, a single time slot serves all these functions. Struggling ringers in particular need all the help, and all the productive hands-on time, they can get. Set two call times: one for the setup team, and another for all ringers to have “hands on bells.” Encourage ringers to arrive a few minutes early to get out their bells and check they have everything they need (including chimes and mallets) in front of them at the start time. Stopping rehearsal to get out equipment is a sign of poor planning and communication. Can you imagine an orchestra percussionist holding up rehearsal to fetch mallets?
Set a good example of promptness and preparation yourself, and don’t wait for latecomers. When you do, you punish the people who arrived on time by making them wait, and you encourage further tardiness. There will always be traffic and parking issues, or the need to fill a water bottle or use the restroom; ringers need to factor this into their planning, not use it as an excuse. If your group has formed a habit of starting late, try this. Once everyone is at the bell table and paying attention, look at your watch and say, “It’s 7:45 (for example) and we are now all here. Next rehearsal, I’d like everyone to start getting ready for rehearsal 15 minutes earlier than you did today, so we can start on time at 7:30.” You may need to do this several weeks before the message sinks in that you’re serious. If you have a single persistent latecomer, first speak privately to the individual, so you can decide whether the persistent lateness is excusable (for example, a work or childcare issue beyond the ringer’s control). If the ringer has agreed to arrive on time and doesn’t, start the rehearsal without him or her. When s/he arrives, stop what you’re doing and say, “Our rehearsal starts at 7:30. I need everyone at the bell table ready to ring at 7:30 next week. We’re on (name of piece) at (measure number).” Then go back to what you were doing. Do NOT backtrack or stop to fill in the tardy ringer. Naturally you wouldn’t take this approach if someone is usually on time and just got delayed one week, but it’s a good solution to persistent tardiness.
Keep an eye on who’s doing the setup work. Carrying just the mallet bag or a small bell case down the hall isn’t a fair share of setup duties. Resentment builds when the same people have to do the heavy lifting every week, so designate setup and teardown teams, and streamline the work. Leave the tables and foam set up whenever possible, or arrange for someone on church staff to set them up. Invest in carts and half-size or wheeled bell cases to allow everyone to move equipment, and set an expectation that setup and teardown are everyone’s responsibility.
When rehearsal lasts more than an hour, allow time for a break. Otherwise, people wander off to the bathroom or drinking fountain, and you waste time waiting for them to return. If they know a break is coming, they’ll wait for it. Set a timer so the break ends promptly and you can get back to work. Designate a time for fellowship, perhaps a group devotion at the beginning of rehearsal and/or snacks together at the end. Ringers feel a stronger commitment if they form bonds within the group, and you can hold a more focused rehearsal and make bell choir enjoyable if you’ve accommodated the group’s social needs.
Getting your point across: Don’t speak to ringers while they’re playing; they can’t hear you. Wait until the ringing stops, they’ve had a moment to find their mistakes and mark their music, and all eyes are on you before you speak.
Feel pestered by this question? “What measure are we starting on?” If you cue the measure every time you resume ringing, they’ll stop asking. Give a measure number (or rehearsal mark) instead of saying “same place.” Discourage ringers from requesting specific measures that slow down the group. These are best addressed privately, or in sectionals, discussed below.
When you say “there should be an accent on beat 3 of measure 17, Amanda,” what happens? Amanda wakes up at the sound of her name, and asks you to repeat what you just said. Then she’s not sure what to do with the information, and you not only waste time but embarrass her as you belabor the issue. Instead, communicate information in this order:
• Who you’re speaking to, by name, position, or section
• Measure number, then beat
• What you’re pointing out
• How you want the bell to move
• What sound you hope to hear
Example: “Amanda, in measure 17, beat 3 (pause while she finds it), that symbol above your E6 is an accent. Ring the bell with a little more power so it stands out from the surrounding notes.” Then direct a section that includes that measure, so she learns by doing.
Ask ringers to apply your feedback without discussing it first (unless they have no idea what you’re telling them). That way, it becomes part of their artistry, instead of generating debate. The mere act of trying your approach may resolve any questions or concerns they have.
Channel the helpers: Discourage “directing from behind the table.” Such helpers mean well, but they actually make things worse, especially for struggling ringers. Put yourself in the struggling ringer’s shoes for a minute. S/he is trying to read the music, remember which hand to use, get the bells to ring at the right time, remember what all the squiggles mean, watch the director, listen to his/her own part, and listen to the rest of the choir. Then someone starts counting aloud. It’s just too much, and can embarrass the struggling ringer. It’s especially confusing when someone starts counting aloud and isn’t with the director. If counting aloud is needed, have everyone do it. Don’t allow talking or singing while ringing, unless the piece has an actual vocal part; it’s distracting to ringers trying to concentrate. When someone misses a key change, and someone shouts “F#,” it embarrasses the person who made the mistake, as though they were deaf as well as stupid. There’s only one director in the room: the person waving her arms around up front.
Tell experienced ringers: the best thing you can do to help other ringers is play your own part well. It’s much easier to play next to a strong ringer than a weak one, so form the backbone of the bell choir that everyone can rely on. Experienced ringers can also mentor others outside of rehearsal. Struggling ringers need someone to answer questions, but sometimes the director is busy or a ringer is embarrassed to ask yet another question, especially in front of the group.
If the group has chimes, or access to a second set of bells, try duplicating a part. While standing next to a stronger ringer, ringing the same part, a new or struggling ringer gains confidence and can get some quiet coaching. Experienced ringers also make good section leaders.
Sectionals: Just as with a voice choir, separating the group into sections allows in-depth rehearsal of isolated musical lines. The director decides what each group will work on, which may differ among the groups, depending on their challenges. The section leader helps the other 2-3 people work through their part, while the director works with one of the groups, perhaps teaching four-in-hand to the trebles or weaving to the bass. If possible, set up the sections in separate rooms or at different ends of a large room. You might have the bass in one place, battery in another, and treble in the third. The division of the groups will depend on the music you want to work on; sometimes the battery splits differently, or you might divide the group in two or four, rather than three.
When I taught a beginning bell choir, I liked to hold sectionals once a month. They’re very popular with ringers, who spend less time standing around in rehearsal while other ringers drill their part. It’s also easier for struggling ringers to get the help they need in a smaller group, and gives section leaders a challenge, plus recognition for their skills. If you can’t break the group into different rooms, here are some ways you can create a sectional within rehearsal:
• When you go for a break, dismiss only part of the choir (say the trebles) while you work with the bass for 15-20 minutes. Then the trebles return and the bass goes on break.
• Work with one group while the other group turns their bells sideways so they ring silently. The group you’re drilling can hear their musical lines clearly while others still get practice on their part, and giving the otherwise idle group something to do keeps them engaged. The week following sectional, you can use this “air bell” approach to quickly review the musical lines drilled separately the previous week before putting them together.
Practice when possible in performance conditions: While no pastor alive will let the bell choir rehearse in the sanctuary during Sunday worship, try to make your bell choir’s rehearsal setup match, as much as possible, the configuration, lighting, and acoustic conditions associated with performance. If you rehearse in the church hall in a U shape, then set up in the chancel in two rows, ringers will spend time adjusting to the new space. When you consistently set up in the same configuration, everyone knows where s/he belongs, instead of negotiating for table space. I used to ring in a bell choir with rehearsal tables set up at random, with the U facing a different direction or the corners reconfigured, and the group spent a surprising amount of time adjusting every rehearsal. Even the table cover color matters; if you practice and perform on different colors, it can confuse ringers. If you reserve your table covers for performance, at least choose the same type and color of fabric for your practice top cover.
In future posts, I’ll talk about approaches to teaching rhythm, techniques, and page turns.
Copyright © 2015 Nancy Kirkner, handbells.com