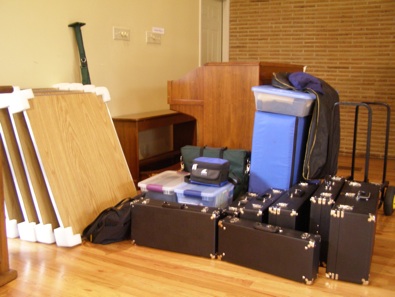
 The amount of equipment required is one of the limiting factors in solo handbell performances, and it took a while to sort out the best way to handle it all. For one of my concerts, I transported everything shown here surrounding the organ console and bench.
I usually take:
• Four folding handbell tables (Schulmerich adjustable height). This accommodates 9 linear feet of ringing space, plus an extras table. (If I don’t need the extras table, I leave it home.) I transport the bells with their styrofoam packing corners, so they don’t scratch my car or the walls and floor of the venue. This isn’t ideal, as sometimes the tables don’t fit through doorways. I’m exploring other ways to cover the sharp corners.
• Foam pads – 9 linear feet of 3” thick foam, plus a piece 1” thick for the extras table, in a blue nylon carry bag. I also carry No-skid pads to put between the foam and tables, so the foam doesn’t slide. You can find it in stores that carry drawer liner, like drugstores and closet stores. I have an additional piece of 1/2” thick foam that covers the whole length of my main table, to bridge the gaps between the pieces of thick foam. I’m considering buying a single piece of 1” thick foam that I would use instead of my existing arrangement, to cut down on what I carry to concerts.
• Bells – the number of bells and cases I bring depends on the pieces I plan to play. My usual range is C5 to G7, but I also own C4 to B5. I bought the Malmark half-size cases, which are easier to carry and load in the car. This splits the first and second octave into 4 cases instead of 2. I didn’t buy the case for the lower fourth octave (G4-B4). Instead, I bought the case for C4-D#4. This holds 4 bells of any size, so I use it to carry the four largest bells (from C4-B4) I need at the concert, using fabric to pad the space as needed. If I need more than 4 large bells, I carry an extra bell in a locking plastic box with padding, or use the bell cases that came with the bells when I bought them. I made drawstring bags out of sweatshirt fabric, in assorted sizes, which are handy for toting random bells.
A handy tip: you can put a smaller bell in a larger slot, but not vice versa. So, for example, if I need A7 but not C#5, I can move every bell down one position in the cases to make room (or I can carry a small bell like A7 another way). Along the same lines, Schulmerich bells will fit in Malmark cases because the castings are slightly smaller. However, Malmark bells won’t fit in Schulmerich cases in the same labelled slots.
Many soloists use Port-a-Bell cases to transport their bells. They would be essential for flying. However, I mostly perform places I can reach by car, and I often load and unload at the venue by myself, so I’d rather use many smaller, lighter cases than one large heavy case. If I get a distant opportunity, I can always buy a Port-a-Bell case, or ship my bells ahead.
Another tip: If you store as much of your equipment as possible in one place, you’re more likely to remember everything. (I wish someone had suggested that when we bought our first sailboat!) In my final run-through, I put away all the bells I don’t need. (I have a closet near the bell table with padded shelves to store extra bells.) I get out all the other equipment I need, like mallets. At the end of my run-through, I know exactly which bells to take to the concert: the ones on the bell table. I’m confident that’s right, because I just played the concert with what was in front of me.
Other things I take with me:
• Table dressing – packed in a long plastic box (35” x 16” x 6”). This includes the corduroy table top and separate skirt that attaches with Velcro. The table top is always cotton corduroy, for its acoustic qualities. Changing the color of the table top causes confusion in finding bells, so I always use black, and choose table skirt colors to coordinate. For example, a black top looks sharp with a maroon table skirt. I have different table skirts for concerts (velvet) and church services (corduroy). I carry a thin foam pad and table dressing for the extras table whenever I use it, which depends on the concert repertoire. This usually requires an extra plastic box.
• A sheer black cloth to cover the bells – helpful if I need to change clothes (or leave the room for another reason) after setting up the bells, or to discourage others from handling my bells, or if baptismal water is sprayed on the church congregation. If I’m ringing bell trees, I carry an additional cloth for each side of the bell tree.
• Convertible cart – Rock N Roller multi-cart model R6 (mini). This type of cart has high sides to keep the bell tables and cases in place. I got the size that fit best in my car with a full load. Once everything’s inside, I stack the bell cases on the cart so I don’t have to lean over very far to take bells out. Then I can roll the cart out of sight, bell cases and all, to get all that stuff offstage. I sometimes leave the cart home if I’m 100% sure I won’t need it, such as loading directly onto the stage through a door to the parking lot.
• Concert attire – in a garment bag. I wear casual clothes for setting up, then change either before the warmup, or after the warmup while the audience arrives.
• A meal – because of the setup time required, I nearly always need something to eat at the venue either before or after the concert.
• Mallets, small percussion, chimes, etc. depending on the concert repertoire
I have duplicate tables, foam, and corduroy table top, so I don’t have to tear down my practice setup for every concert. We have steep stairs in our house, so this saves not only time but wear and tear on my husband and me. We store the performance tables on the cart near the garage, and the foam flat on a shelf nearby. If I didn’t already have duplicate tables (which I got at a bargain price from a nearby bell choir), I would probably make risers so I could use whatever tables each venue provides.
If using bell trees, I carry:
• Bell tree stand base in a custom bag (green bag in picture at top)
• Bell tree stand arms in a custom sleeve, inside the bag
• Bell tree stand pole in a custom cover
• Small bag with spare bell tree clips (both wire and acrylic), O rings, screwdriver, spare fasteners, notes about where to position each arm, and a ruler.
I carry the bells (already treed up and with clips in place) in a plastic box (26” x 16” x 6”) with a locking lid. An old quilt cut into panels protects the bells. One box holds enough bells for one arm on the stand (either C5 to B5 or C6 to G7). I usually carry mallets and an extra pair of gloves in the box, as well as any acrylic clips needed. I also have a duplicate bell tree stand so I don’t have to take mine apart to take to concerts, then reassemble it at home.
 Although having all this duplicate equipment is admittedly a luxury, it enables me to perform frequently. It already takes more than 8 hours on concert day to pack up bells, load the car, drive to the venue, unload, set up, warm up, change clothes, perform, talk to the audience, pack up, load the car, drive home, unload the car, and unpack all the bells. Saving an hour each time by using duplicate equipment makes a big difference.
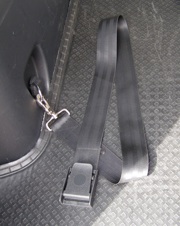 My husband usually packs the Bellmobile for me and unloads it when I return home. He’s worked out the best use of the interior space. I made straps with wide seatbelt webbing and plastic buckles purchased from Seattle Fabrics (which will ship to other cities). We secure the straps to the cargo anchors, then strap the tables and cart in place. Even for short distances, I don’t want a sudden stop to send equipment flying forward into my head. This is what one strap looks like. The mate looks similar, just without a buckle. (I used a BBQ lighter to seal the cut end.)
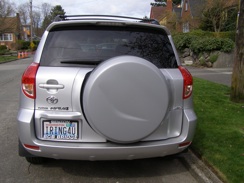
Before buying this car (a Toyota RAV4) to replace my beloved Honda Civic, I tested the loading with empty bell cases, and also drove the car home to check the fit inside our tiny garage. We don’t often leave bells in the car overnight, but it’s useful to have the option to park the loaded car indoors, in case I need to leave early in the morning or return late at night. Sometimes we park the car in the garage because it’s too hot to leave the bells and foam in the sun, even briefly. I would have preferred a Honda SUV, but the outside was curiously too big for the garage, and the inside was too small to hold all the equipment.
In planning concerts, I now pay closer attention to how much equipment I have to transport for a given program. I once played a 20 minute program that required a full table setup with extras table, chimes, bells below C5 (in addition to my standard setup C5-G7), and a stand and duplicate bells for a bell tree piece. That taught me a lesson! Now, in particular, I don’t program a bell tree piece that requires the stand (and duplicate bells) for anything less than a full concert. When I learn more bell tree repertoire, I plan to take only the bell tree setup to play selected short programs. I no longer program the English bell tree and Japanese bell tree in the same concert. I also decided against buying chimes specifically because of the transport issue. If I must use chimes, I plan to borrow them for the foreseeable future. You may make different choices, especially if you’re using the tables (and possibly foam and bells) you find at the venue. Variety in a concert is great, but it comes at a price.
At venues, I try to park as conveniently as possible for unloading, even if I have to move my car afterwards. It’s important to make these arrangements in advance with someone authorized to grant access to a stage door, or whatever. Thoughtless front desk people sometimes prevent performers from using a convenient door, because, from their perspective, it’s only another 15 or 20 minutes to unload using the door right in front of them. From my perspective, it’s an added half hour or 40 minutes (to unload and reload) in an already a long and strenuous day. Not many musicians bring half the contents of their living room to perform!
At venues where parking is difficult or expensive, my husband may drop me off with all my equipment, then return after the concert to help me load. In that case, it’s doubly important to count bell cases, tables, etc. to make sure I have everything unloaded before he leaves. I’m also more careful about packing the car in the first place, so the camcorder tripod doesn’t hide on the floor behind the driver’s seat, for example.
Before setting up, make sure the piano is positioned roughly where you want it during the concert. Once the bell tables are set up and dressed, the piano may be blocked in, on the wrong side of the stage. Some venues have rules that only staff can move the piano, or it may be too heavy to move by myself, so I try to remember to ask when the staff member first escorts me to the room. Also check the position of the front row of chairs. Nursing homes often leave space in front of the front row for wheelchairs, which needs to be considered in positioning the bell tables. Check the lighting; avoid shadows on the bell table and glare in your eyes. Check the floor; sometimes there’s an electrical box in the floor that may make noise every time you step on it.
I have a handy box of gadgets I take to every concert:
• Tool kit – hex driver, hex key, screwdriver, nut drivers (2 sizes), needle-nosed pliers, lubricant pen, plastic tube for loose parts, paint brush to clean out the clapper mechanism, black vinyl tape for emergency handle repairs
• Spare parts kit – parts for every size bell I own: axles, spacers, springs, ny-liners, index pins, washers, bumpers, stop nuts, cap screws, plus spare table parts (feet and bumpers) and spare wing nuts for the case that holds my Japanese bell tree. (Spare parts for the English bell tree go in the bell tree bag.)
• Bell repair manual
• Shims – to level tables
• Small spirit level – to check whether tables are level, before and after using shims
• Lint roller – to clean the table cover
• Rag – to wipe off wet tables or bell cases (this is Seattle)
• Polishing cloths – cloth diaper for wiping down bells after the concert, polishing cloth with rouge part in a separate bag
• Pins – with glass heads to divide the table into zones, and T-pins in case I need to secure anything to the table, like a loose part of the skirt
• Gloves – Isotoner, 2 or 3 pairs of handbell gloves without dots, one pair with dots, plus wrist supports
• Ballet slippers
• Office supply box – scissors, tape, sheet music reinforcements, Band-aids, cough drops, moleskin, sewing kit, rubber bands, safety pins, nail clippers, small Swiss army knife, keys to lock bell cases if necessary. I also carry a Sharpie marker and extra name labels, in case I need to label something as mine, a small jewelry bag to hold my watch when I remove it before ringing, and small bags in case I need to take a bell apart and carry it home disassembled.
• Tissues
• Card with my accompanist’s phone number and numbers for back-up accompanists
• Earplugs – unsupervised children like to pound on the piano while I’m cleaning up, which gets old quickly
• Singing bell pestle – in a fleece sleeve
• Bag for table corners
This all fits in a plastic box 17” x 11” x 6 1/2”, labeled with my name, and with a locking lid to prevent spills during transport. During the performance, I keep the box open someplace I can easily reach it. That’s generally under the table, but it might be backstage if I’m sitting there for part of the concert. This allows me to get something like a tissue or new gloves without rummaging around making noise.
I also take my music bag to every concert. This contains:
• Music binder with all accompaniments (in case of emergency), concert programs, setup notes, script (if any), signs asking that bell tables not be moved without my help (in case I leave them set up somewhere unattended), and equipment checklist. I usually send the program ahead for copying, but always carry the master (in case it isn’t received) and my copy, which indicates the time each piece takes, warm-up plan, the program halfway point, and breaks in videotaping (30 minute file limit on my camera).
• Publicity materials (postcards with future concert dates, cards audience members can fill out to get on my mailing list, and pens), plus any signage I promised to bring
• Pencils
• Water bottle
• Musician’s earplugs
• Directions to the venue, contact information
• Cosmetics case
• Jewelry, wallet, sunglasses, keys, etc.
• For out of town travel: maps, lodging confirmations, etc.
I seldom carry a music stand. I ask for one at the venue to hold my setup notes and program. If they don’t have one, I use the extras table (if any) or a chair. If you want to be sure of having a music stand to hold your sheet music, you can buy a folding one. I recommend the Manhasset Voyager stand. Something else you may want to take is a camera. I sometimes wish I had a photo of every venue with my equipment set up, both as a memento and to help remember next time where everything fits best. If you need to move some of the venue’s furniture, like the altar in a sanctuary, taking a “before” picture helps you remember where to put things back. I used to carry an extension cord, but I never used it, so I put it in my teaching supplies box instead. I gave my accompanist a portable piano light as a birthday gift; otherwise I’d carry a music stand light. Another potential item is a portable microphone, which I’m still researching.
When attending a handbell event, it’s critical to mark every single piece of your equipment. Handbell stuff all looks alike and can get mixed up quickly with other people’s equipment. I put small labels with my initials inside the bell handles, on the mallet handles, on the bell tree base and pole, on all my tools, etc. I know of one ringer who bought a particular color of pony tail holders and put them on all her equipment. Clever! I marked my tables and foam not only with my name, but with an indication of which side goes where, to speed up setup.
When transporting equipment for a bell choir, I suggest using checklists and a “divide and conquer” strategy. Why make everyone wait around until the last car is loaded? Give each driver an assignment and helpers, and let each car leave as soon as it’s packed. A great transport strategy for a community bell choir is to assign publicity tasks (like putting up posters) and loading tasks at the venue to members who live nearby. Assign transport duties to members who live close to the rehearsal space where your equipment is stored. You can also selectively send ringers home with equipment (like foam and music stands) after the final rehearsal, saving them a trip to pick up equipment on concert day.
Copyright © 2012 Nancy Kirkner, handbells.com