Mallets are an external clapper mechanism. They can be used to create either a stopped sound (malleting bells on the table) or a sustained sound (malleting bells in the air, either singly or in bell trees). The object is to produce the same timbre as the clapper would. Bell manufacturers provide a variety of mallets intended for particular ranges of bells. In general, the bigger the bell, the bigger and softer the mallet. The mallets may be covered with yarn or other soft material. Smaller bells call for smaller, harder mallets, often made of rubber or plastic.
You can cause damage by using mallets not intended for a particular bell, or using improper technique. That can happen with an excessively hard handbell mallet, a mallet intended for another instrument, or when striking the bell in the wrong spot. Remember this when experimenting. Although I’ve never broken or damaged a bell, your mileage may vary. Also note that I experiment only with bells that belong to me, not with borrowed bells.
There are 3 main sources of handbell mallets: Malmark and Schulmerich (the U.S. handbell manufacturers) and Jeffers, which distributes mallets under the TruTimbre brand. Each uses color-coding to help you remember which mallet to use on which bell, as well as a label somewhere on the shaft.
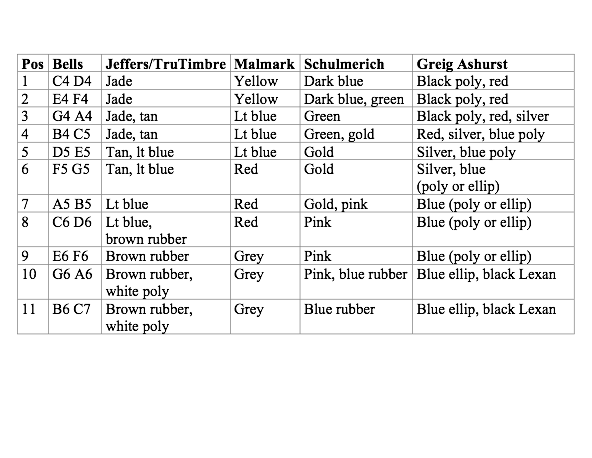
In each set, a single mallet covers a slightly different range. In the picture above, you can see the high treble mallets offered in each of the three handbell mallet brands. Here’s a table with the mallets designated for a 3 octave bell choir (11 positions), updated May 2014 to reflect the new Greig Ashurst series available from Schulmerich: Additional update October 2018: Stafford Regional Handbell Society, the respected organization led by Phillip Lanier and Neesa Hart, introduced a line of mallets designed by handbell musicians. They have lighter shafts than other mallets, and can be ordered in your preferred colors. Stafford Signature Mallets are currently available through Frick and Frack Music.
The bell manufacturers publish tables showing how many of each kind of mallet they recommend for a bell choir using certain octave ranges. I bought the full range of Schulmerich mallets to match my solo bell set, one pair of each mallet. I seldom use the lower mallets, but once in a while I need them. When buying mallets for a choir, buy at least two for each position. It’s less tiring to alternate hands, and you get a better sound, even if striking the same bell repeatedly. You use different mallets to get different kinds of sound (dry, crisp, bright, etc.). Blend the sound from the outside of the choir inward to the middle, trying different mallets on the battery bells until you achieve the sound you want.
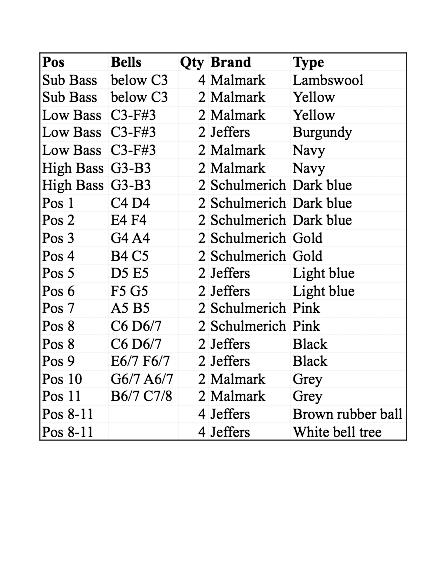
You may prefer to mix brands of mallets. Here’s a table of the mallets used by one community choir I know: Handbell mallets have some additional features you may like. Schulmerich (‘clickless’) mallets have a sleeve just under the head to prevent clicking when the mallet strikes somewhere it shouldn’t. Some people don’t like the sleeves, because they alter the physical balance. Jeffers offers an optional “comfort grip” handle, especially on bass mallets. These fit only Jeffers mallets, not other brands.
You may find that grey Malmark mallets leave spots on your bells. That’s because the manufacturing process leaves an oily residue on the mallets. Clean the mallets with a small amount of rubbing alcohol, or use a damp cloth with a dot of degreasing dish soap, then “rinse” off the soap with a clean damp cloth. Wipe spots from the bells with a soft dry cloth, using the rouge portion of a handbell polishing cloth as needed.
Tips for choir ringers:
When handing out mallets, start from one end of the choir, and put two mallets at each station, starting with the hardest mallets (from the top) or softest mallets (from the bottom) until you run out of mallets. Let the ringers at each position trade as needed; the mallets they need will be in the vicinity.
Learn which mallets belong to your station, and check that you have them before rehearsal even if you don’t think you need them. It’s a waste of everyone’s time to track down mallets once rehearsal starts.
Keep your mallets in the same place on the table all the time. That way, you automatically reach for them when you need them, and don’t have to shift your gaze from the music and/or director to hunt for your mallets.
At the top of every piece of music, note which bells you use, which you start with, and which mallets or other equipment you need for that piece.
In solo work, we often need a mallet that covers a wide range of bells. Though there’s no ideal solution, you might try (depending on the range of bells, what effect you’re aiming for, and the acoustics of the room):
Musser M-25 – my preferred solo mallets in the C5-C6 range, on the table
Mike Balter 25R silver yarn mallets
Malletech NR29R grey rubber – my preferred bell tree mallets
Schulmerich pink yarn mallets
Schulmerich blue rubber mallets
Malmark grey rubber mallets – my preferred solo mallets for C6 and up, on the table
Jeffers brown rubber mallets
Jeffers white poly mallets
Though the Malmark grey mallets and the Schulmerich blue mallets look nearly identical, they do produce a different sound. I prefer the grey mallets on the table in the upper range. I used to use the pink ones on the table in the lower range, but they wear out quickly, and I discovered the Musser M-25s, which I now prefer. The white mallets are extremely bright and best for playing bell trees in a large room. I sometimes use Jeffers brown mallets when first learning a bell tree piece, because they seem a little softer, and easier on the bells and ears. In general, I prefer Malletech NR29R for bell trees in the range G4-G7. In large spaces, consider poly glockenspiel mallets (Mike Balter 91B XL) for bell trees – these are very bright!
I purchased two pairs of the new Greig Ashurst mallets, the blue poly and blue elliptical, hoping to use them for bell trees. I was disappointed, because the shaft of the blue poly is very heavy, and the mallet produces too many overtones and a muddy sound on bell trees. The blue elliptical isn’t an improvement over what I was already using. However, these mallets are very popular with some ringers. Your mileage may vary.
You increase your options by holding two mallets in hand. There are multiple grips for this, which will be covered in another article. The choice of mallets when holding two in hand will be different for table vs. bell trees. On the table, you’ll mallet lower bells mostly with your left hand, upper bells mostly with your right hand, and middle bells with either. You might choose:
Outer left – yellow yarn
Inner left – pink yarn
Inner right – pink yarn or brown rubber
Outer right – grey rubber
Experiment with the combination that gives the best sound for the bell range you’re working with. Look for video of a marimba player to see an example of using multiple mallet types in a piece.
On bell trees, you’re more likely to alternate hands as you strike bells throughout the entire range. You can try one pink yarn and one grey rubber mallet in each hand, so you have one soft mallet for low bells and one harder one for high bells. I prefer to use one mallet pair across the whole range, if possible.
It’s also possible to buy percussion mallets that are two-tone (hard center wrapped with yarn) or double ended (different mallet type on each end of the shaft). I haven’t experimented with them yet. Two-tone mallets have many layers of yarn, resulting in a larger head than may work with small bells.
When buying percussion mallets, take bells of various sizes to the store, or ask to be allowed to return them after testing at home. Another approach is to find someone whose sound you admire, and ask her what mallets she’s using.
Features to consider when buying percussion mallets:
Shaft length – shorter gives more control, longer gives more reach
Shaft flexibility – rattan is flexible, fiberglass and birch are stiffer and project sound better
Head – size, shape, core hardness
Head covering – density of wrapping, sound quality produced by a particular fineness or texture of yarn
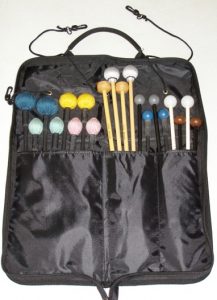
 You’ll also want a mallet bag to protect mallets in storage. You can make a simple drawstring bag, or buy a zippered “stick bag” from a music store. Handbell vendors also sell mallet bags. The main distinction is whether (or how) the bag is compartmentalized.
Compartments work better for a smaller number of mallets. A choir may prefer a larger bag without compartments. It’s also helpful to buy a bag with a hanging loop. The bag shown here (from Galaxy) has both a carrying handle and hanging hooks, as well as outside pockets to hold short mallets.
You can mark your bag with your name (or your choir’s) using a fabric pen, which you can get at a crafts store.
Some bell cases have a long empty side compartment for storing mallets.
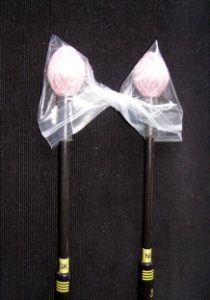
 If you need to carry just one or two mallets in your music bag, you can slip a small plastic bag over the mallet heads, then twist it around itself. This will protect the yarn from catching on things, and keep the mallet heads clean. Avoid putting mallets on the floor or anywhere else they might get dirty. Anything that gets on the mallets may transfer to your bells and/or table covers.
Label mallets on the shaft with your initials or an abbreviated version of your choir name. (I use a label maker.) Whenever you remove mallets from your practice/performance area (e.g. to attend a handbell event), inventory your mallets before you go. Assign one person to check mallets against the list when packing up, and immediately track down any missing mallets. Otherwise, you’re nearly certain to leave some mallets behind.
I’ll write another time about mallet technique.
Resources:
Jeffers Handbell Supply – handbellworld.com
Malmark – malmark.com
Schulmerich – schulmerich.com
Stafford Signature Mallets – frickandfrackmusic.com
Steve Weiss Music – steveweissmusic.com
Copyright © 2012 Nancy Kirkner, handbells.com
