See the article on Mallets for information on buying mallets and matching them to bells.
I strongly recommend scheduling some sessions with a professional percussionist to learn proper mallet technique. Ask around for a marimba instructor: call music stores that sell percussion instruments, contact the local music schools, and ask your musician friends for recommendations. There’s no substitute for hands-on instruction by a pro. Try to have someone come to where your bells are so you can work with your equipment, both trees and table bells. Second best would be to take your bell trees to your instructor’s studio. If neither will work, you can learn a lot using the instructor’s mallets and marimba, but you’ll be on your own transferring that knowledge to bells.
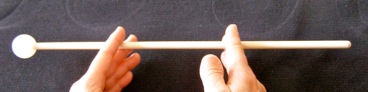
How to hold mallets: On a handbell mallet, the grip point is close to where the shaft protrudes from the plastic handle. If using percussion mallets, or if there is no handle on the shaft, divide the shaft into thirds. Grip at the dividing point furthest from the head.
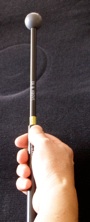 Pinch the handle between the crook at the first knuckle of the index finger and the fleshy part of the thumb. Wrap the other fingers loosely around the shaft so the shaft touches the palm. The mallet shown here is a handbell mallet, and you can see the thicker handle at the base of the shaft.
Think of the mallet as an extension of your hand. Adjust the grip point so the mallet feels balanced.
Hold your hands palms down, hands in line with the forearms, wrists neutral, elbows slightly out to the sides, with the mallet shafts forming a 90 degree angle to each other, level with the table. This should feel perfectly comfortable; relax everything except the “pinch point” until it does.
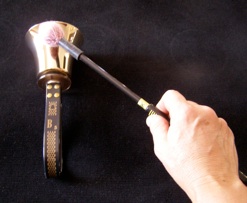 Where to strike the bell: Look inside the bell and you’ll see a line incised at the strikepoint. Bell manufacturers mark that as the point of purest tone, and line up all the bell parts so the clapper will strike there. You’ll probably see marks near it left by the clapperhead. Envision a spot on the outside of the bell that corresponds to where the clapper strikes inside. This is your target. You can also see your head reflected there in the curve of the bell; aim for your face.
If you’re malleting on the table, the target won’t be exactly where the clapper strikes. The strikepoint is on the side of the bell resting on the table, not the side you’re malleting. So your target is exactly opposite the strikepoint.
Think of the mallet bouncing off the bell, pulling the sound from it. The stroke consists of a prep stroke, strike, and rebound. Position the mallet close to the target before the prep stroke to improve the accuracy of your aim. In a single rapid motion, pull the mallet slightly away from the bell, strike it, and pull away again. You don’t want the mallet head to linger on the bell. Think more about pulling up and away rather than hitting down. The motion comes from the wrist, not the arm.
Different sizes of bell call for different degrees of ”pointiness” in the stroke to balance dynamics across the range and deliver the correct articulation. High treble bells need a sharper, pointier stroke, while lower bells need a rounder stroke.
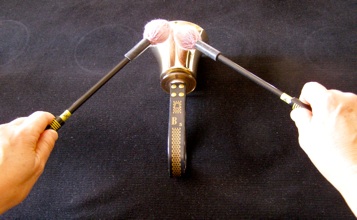 Malleting a single bell on the table: Use one mallet in each hand and alternate hands. It’s less tiring, and results in a better sound. Mallet slightly to either side of the central target, to keep the mallets out of each other’s way.
Malleting two bells some distance apart on the table: Use one mallet in each hand and dedicate each to the bell nearest that side. The mallets in both hands should rebound to the same height. You may need to move one of the bells closer to the other so you can see both easily, and/or turn your body at an angle to the table. You can also practice malleting in octaves to improve your accuracy using peripheral vision. With the bells in a keyboard configuration, strike two bells an octave apart, then move to the next two bells in the chromatic scale, and so on.
Malleting a series of bells (table or tree): Establish standardized spacing to get used to every interval. Practicing scales and arpeggios will help you intuitively find each bell. Move your body to the next bell rather than reaching for it, and move your eyes to where you’re next going to strike. See the article on Footwork for suggestions about moving along the table.
Move the mallet directly, in an arc, from one bell to the next; the end of the arc is the position for the next prep stroke. I suggest you practice this as an exercise in scales: Mallet, move, stop, mallet, move, stop, and so on up and down the scale. When learning this, it helps to say “move” out loud to remind yourself to move the mallet. When you can move quickly with each hand separately, slow it down and do it hands together. You want to learn to move one hand automatically into position for the next stroke while you strike with the other hand’s mallet.
This is also a good way to memorize the series of bells. (You’ll need to memorize malleted passages, so you can keep your eyes on the bells.) Move from bell to bell without striking, until you can move accurately and quickly between bells without wandering or hesitation.
On the table, it’s sometimes easier to mallet bells in a straight line in front of you, especially larger bells. Consider pulling sharps and flats into line with naturals if you have the option. In a bell choir, as a general rule, only larger bells are malleted on the table, while high treble bells are thumb-damped to create the same articulation. High treble bells are a small target and hard to hit accurately, and the sound decays so fast that they’re hard to hear.
Stickings: When malleting a series of bells, whether in trees or on the table, you need to work out the most logical pattern for striking the bells. Usually you alternate hands, which may mean reaching across yourself to mallet with the “wrong” hand. That may not be practical, depending on the relative position of the bells. Just as you would with solo or ensemble ringing, consider the best hand to start each passage, and repeat hands strategically. Experiment with multiple sticking patterns until you arrive at a smooth and intuitive solution, then write lh or rh over key notes in your music to remind you of your sticking choices.
Damping: You don’t generally damp malleted bells. For bells malleted on the table, you may need to damp a bass bell that continues to resonate in conflict with a harmonic change. Simply brush the bell with a gloved hand, from the shoulder to the lip of the bell. If your gloves have dots, use the back of your hand. For bells malleted in the air (discussed below), you can damp the bells at the end of the passage by shoulder or table damping. When there’s a suspended malleted passage at the end of a bell choir piece, a very cool effect is to slowly lower the bells to the table together, damping on the conductor’s cue. Bells in trees can be damped by running a mallet head lightly from the shoulder to the lip of the bell.
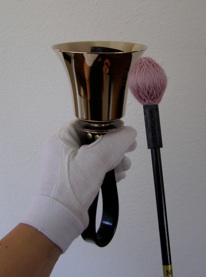 Malleting suspended – single bell: Don’t dangle the bell from its handle; hold it upright as usual, with the clapperhead toward the ceiling. Imagine a line around the outside of the bell the same distance from the lip as the strikepoint. This line is your target, and you can hit anywhere on it that produces a satisfactory tone. I find it easier to strike on the side of the bell closest to the hand holding the mallet. If playing in a bell choir, line up the mallet, bell, and director so you can see them all in the same sightline.
Generally, in a bell choir, smaller bells are malleted suspended, while larger bells are rung and not damped to create the same effect.
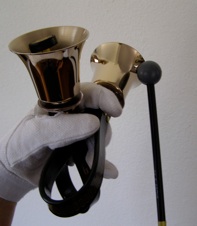 To mallet two bells, hold them in Shelley position. I find it easier to point the pair away from me, like a gun, and strike the side closest to the hand holding the mallet. This photo was taken slightly to one side so you can see the position of the hand, bells, and mallet. Angle the bells to maintain a neutral wrist position in both hands.
You can add a third small bell to this setup by suspending it from your pinky or pinky plus ring finger, or by setting up the bells for 6 in hand.
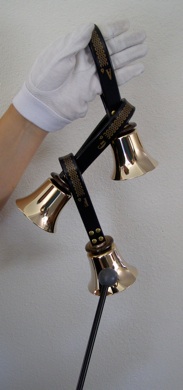 To mallet more than two or three bells, ‘tree them up’ (loop one handle through another) and hold them with one hand while malleting with the other. You can read more about treeing up bells in Bell trees: basics. You can preset the bells, using duplicates if necessary. Be sure to include clips if the handles would otherwise slip over the handguards.
Lay the strand on the table where you can pick it up easily when you need it. Holding the strand at both ends, i.e. the top handle and the bottom bell, makes it easier to pick up and set down without clanking. You can damp a handheld bell tree, if necessary, by hugging it to your body or setting it on the padded table.
If the bells are too heavy, or the strand is too long to hold, or if you need to mallet with both hands, you can use a bell tree stand, or ask someone to hold the strand for you.
This photo is a view from the side. The hand holding the tree is in line with the arm, and the wrist is relaxed.
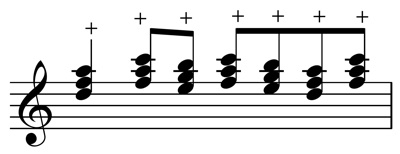
Notation: Malleting on the table is a stopped or staccato sound. In older handbell music, it’s notated as a dot above or below the stem of the notes it applies to. (Sometimes the dot just means a staccato sound, and the director may choose another stopped technique, like plucking.) In newer handbell music, there’s a plus sign over the dot.
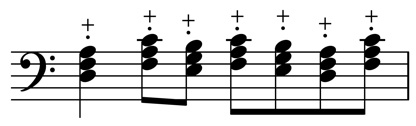
A plus sign without a dot denotes malleting in the air (suspended).
I’ll write more about mallet techniques another time.
Thanks to Linda Krantz and Pearl Melberg for their contributions to this article. Extra special thanks to percussionist Miho Takekawa.
Copyright © 2012 Nancy Kirkner, handbells.com